

Published on ; Last updated on ;
Chickens need physical and mental stimulation, so you need to furnish your chicken’s house. Even if you have a reinforced concrete floor, sound walls, and a roof to keep out the rain, that does not automatically qualify your structure as a chicken coop. An unfurnished chicken coop is like a house without furnishings.
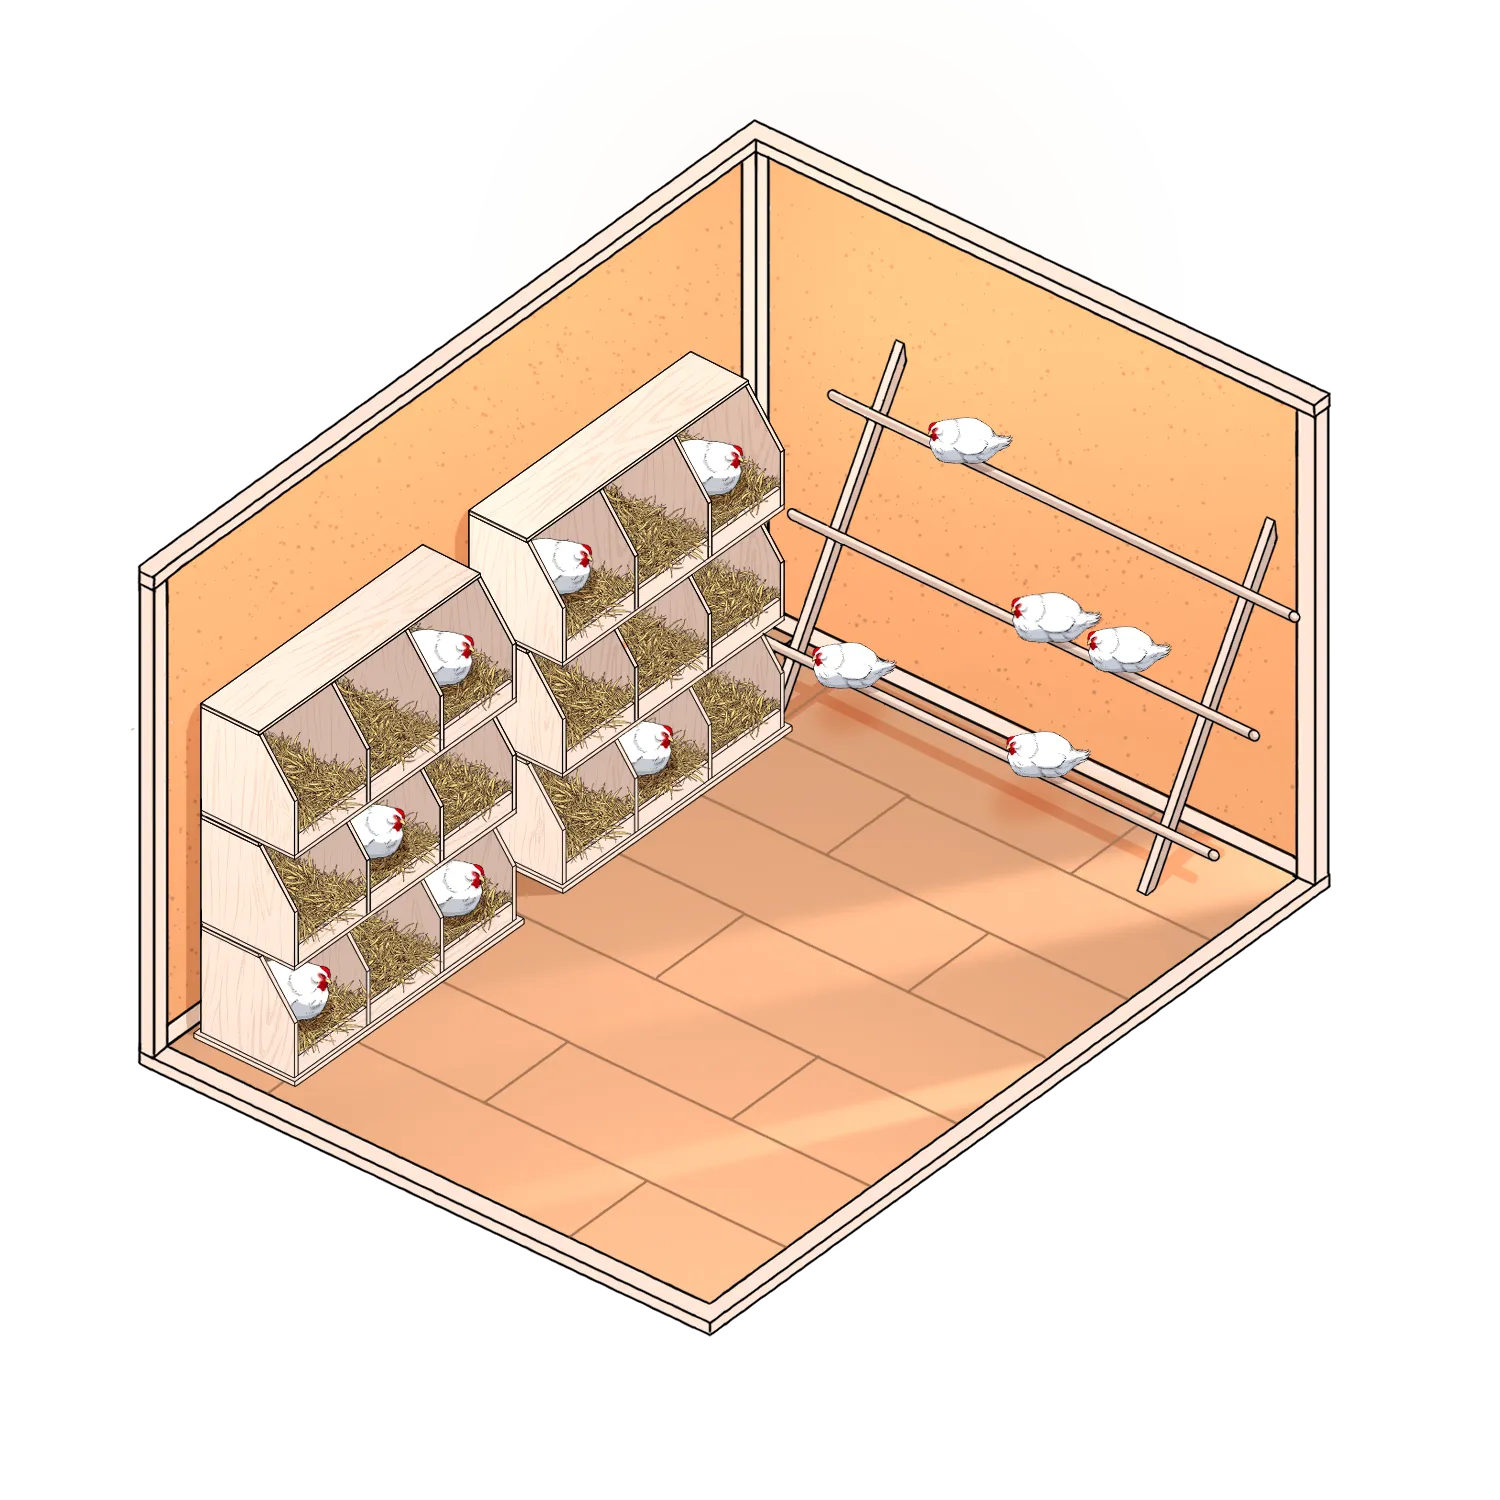
When it comes to providing your flock with desirable comfort, these few key pieces can make your chicken coop complete: roosts, nesting boxes, entry doors, and ramps. Interestingly, building creature comforts is much easier than you can imagine, and it only takes basic woodwork skills and no specialized tools.
Providing enrichment to your chickens allows them to perform natural behaviors and reduces negative emotional states and harmful behaviors like aggressiveness and egg eating. This article provides tips on how to build safe and comfortable chicken coop housing, including information on roosts, nesting boxes, ramps, feeders, waterers, and dust bathing areas.
Table of Contents
Starting with a Solid Floor
It’s essential to understand how much space chickens need for roaming, exploring, and comfortable indoor refuge from the elements. If you are a bird lover considering the chicken-rearing hobby, completing your coop before bringing in the birds is crucial.
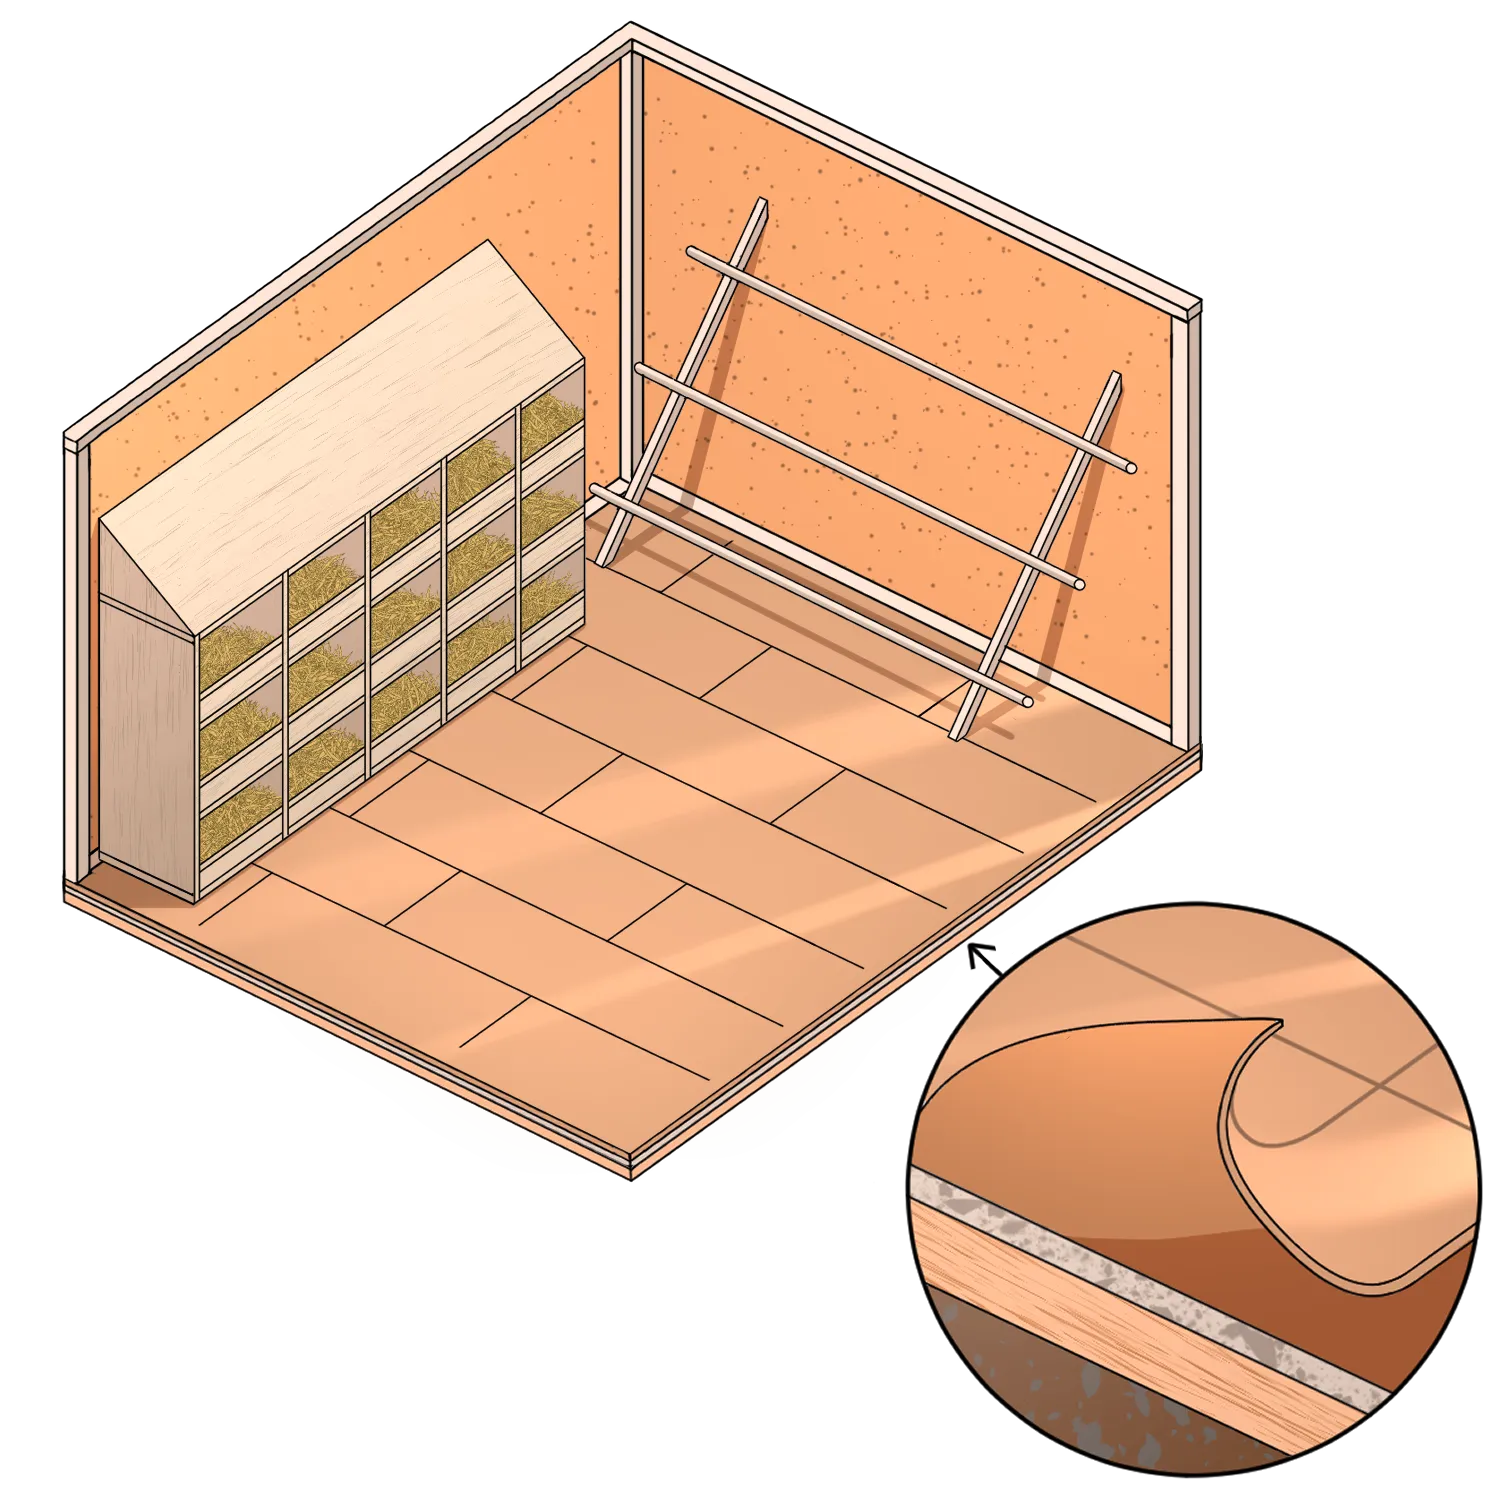
Before furnishing, however, you want to ensure the coop floor is complete. It is essential because working around it will be more challenging after installing perches and nesting boxes.
For instance, use the recommended adhesive for longevity and performance when putting down a floor. Once you are done, you can start building the comforts.
Creating Comfortable Roosts for Your Chickens
Instinctively, chickens perch up off the ground to rest and sleep as they feel safer off the ground, away from predators. For this reason, it is crucial to offer your birds sturdy and comfortable perching roosts.
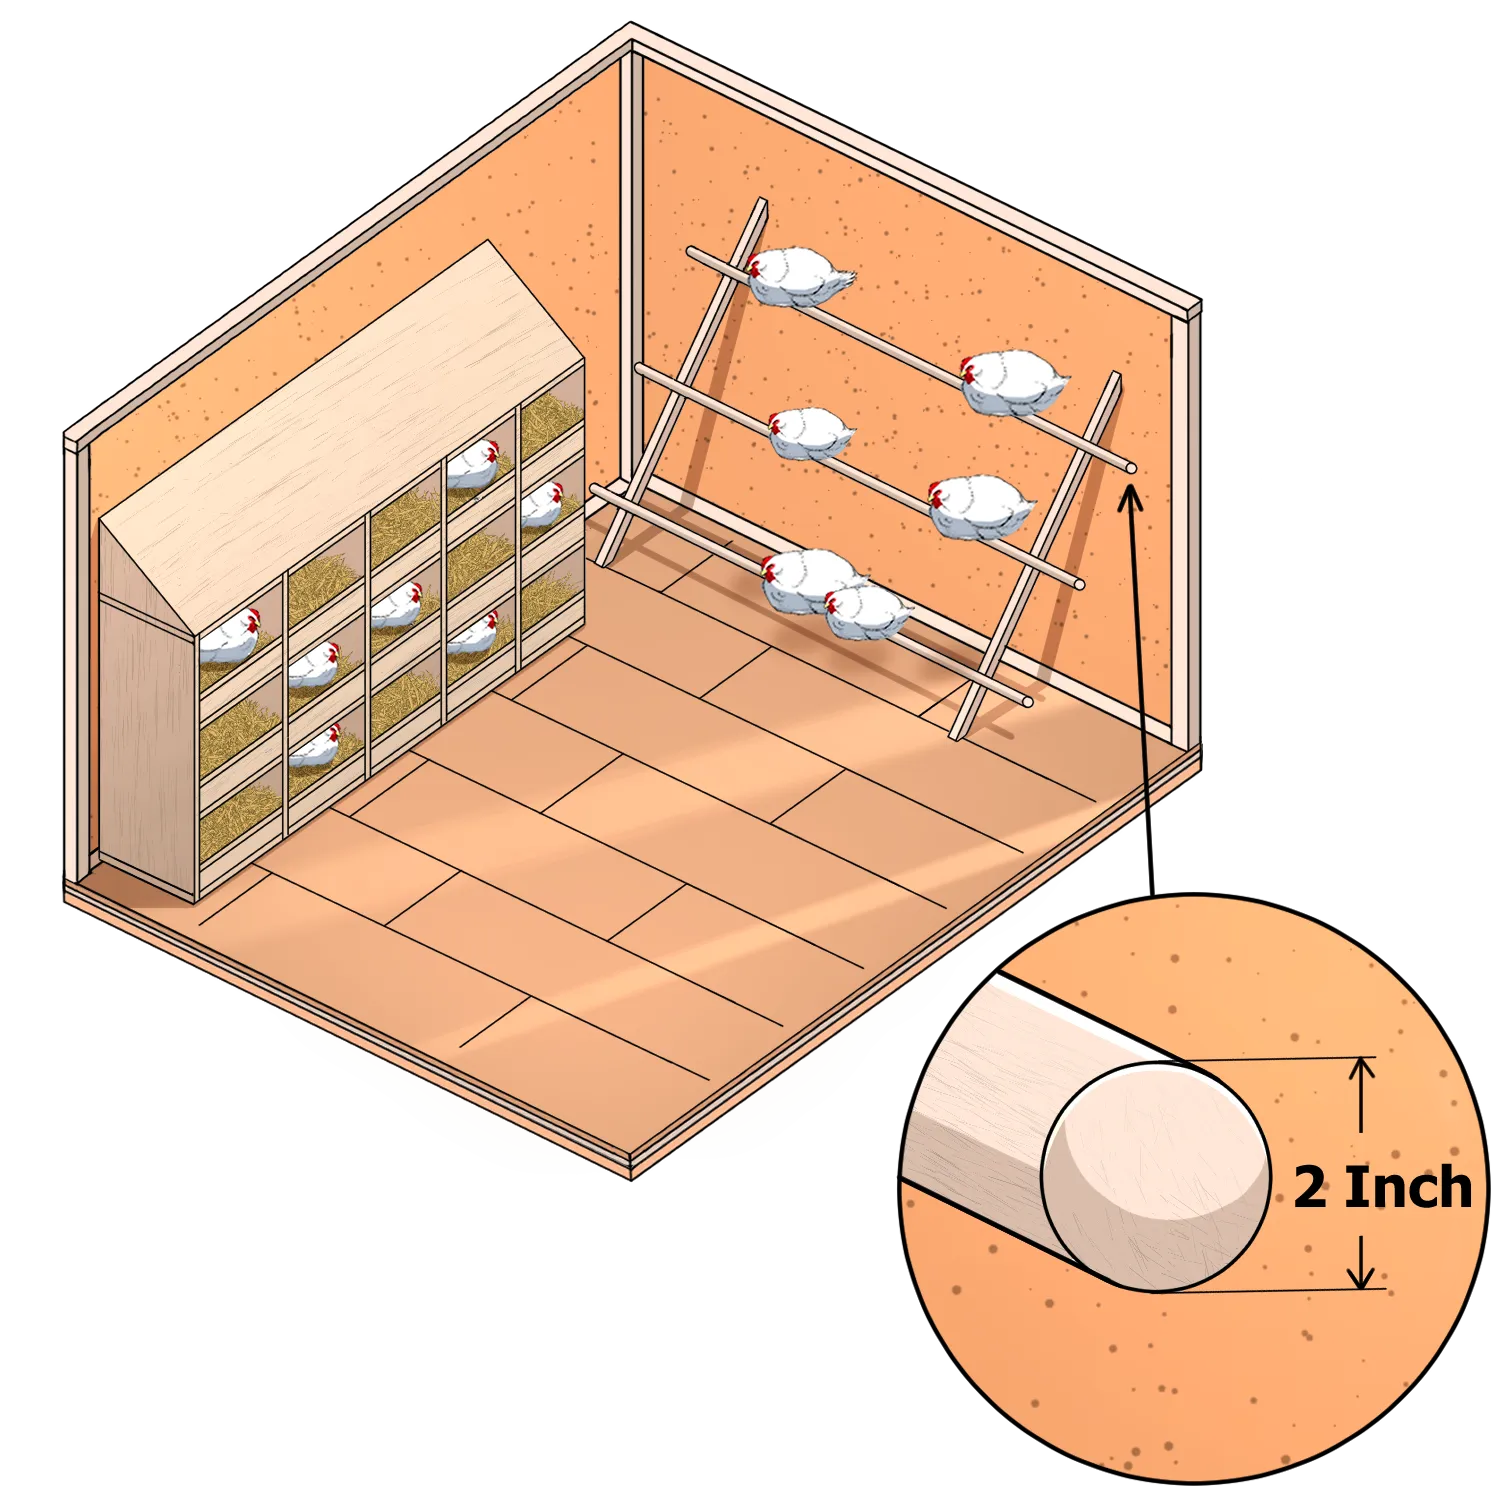
For the uninitiated, roosts are bars where chickens sleep at night or hang out while relaxing in the coop. Adding simple roosts will allow your feathered friends to satisfy their instincts, sleep comfortably, and feel safe at night. You will need perching roosts 2 inches wide for adult chickens. Chickens sleep flat-footed (with their toes slightly curled), so you want to build roosts wide enough for chickens’ comfort. If you are building chicken comforts for the first time, here are details regarding roosting bars.
Heavy breeds like cornish or fast-growing meat birds should not have roosting areas since jumping down from the perch can cause fractures in their hip joints and legs over time.
Location for Chicken Roosts
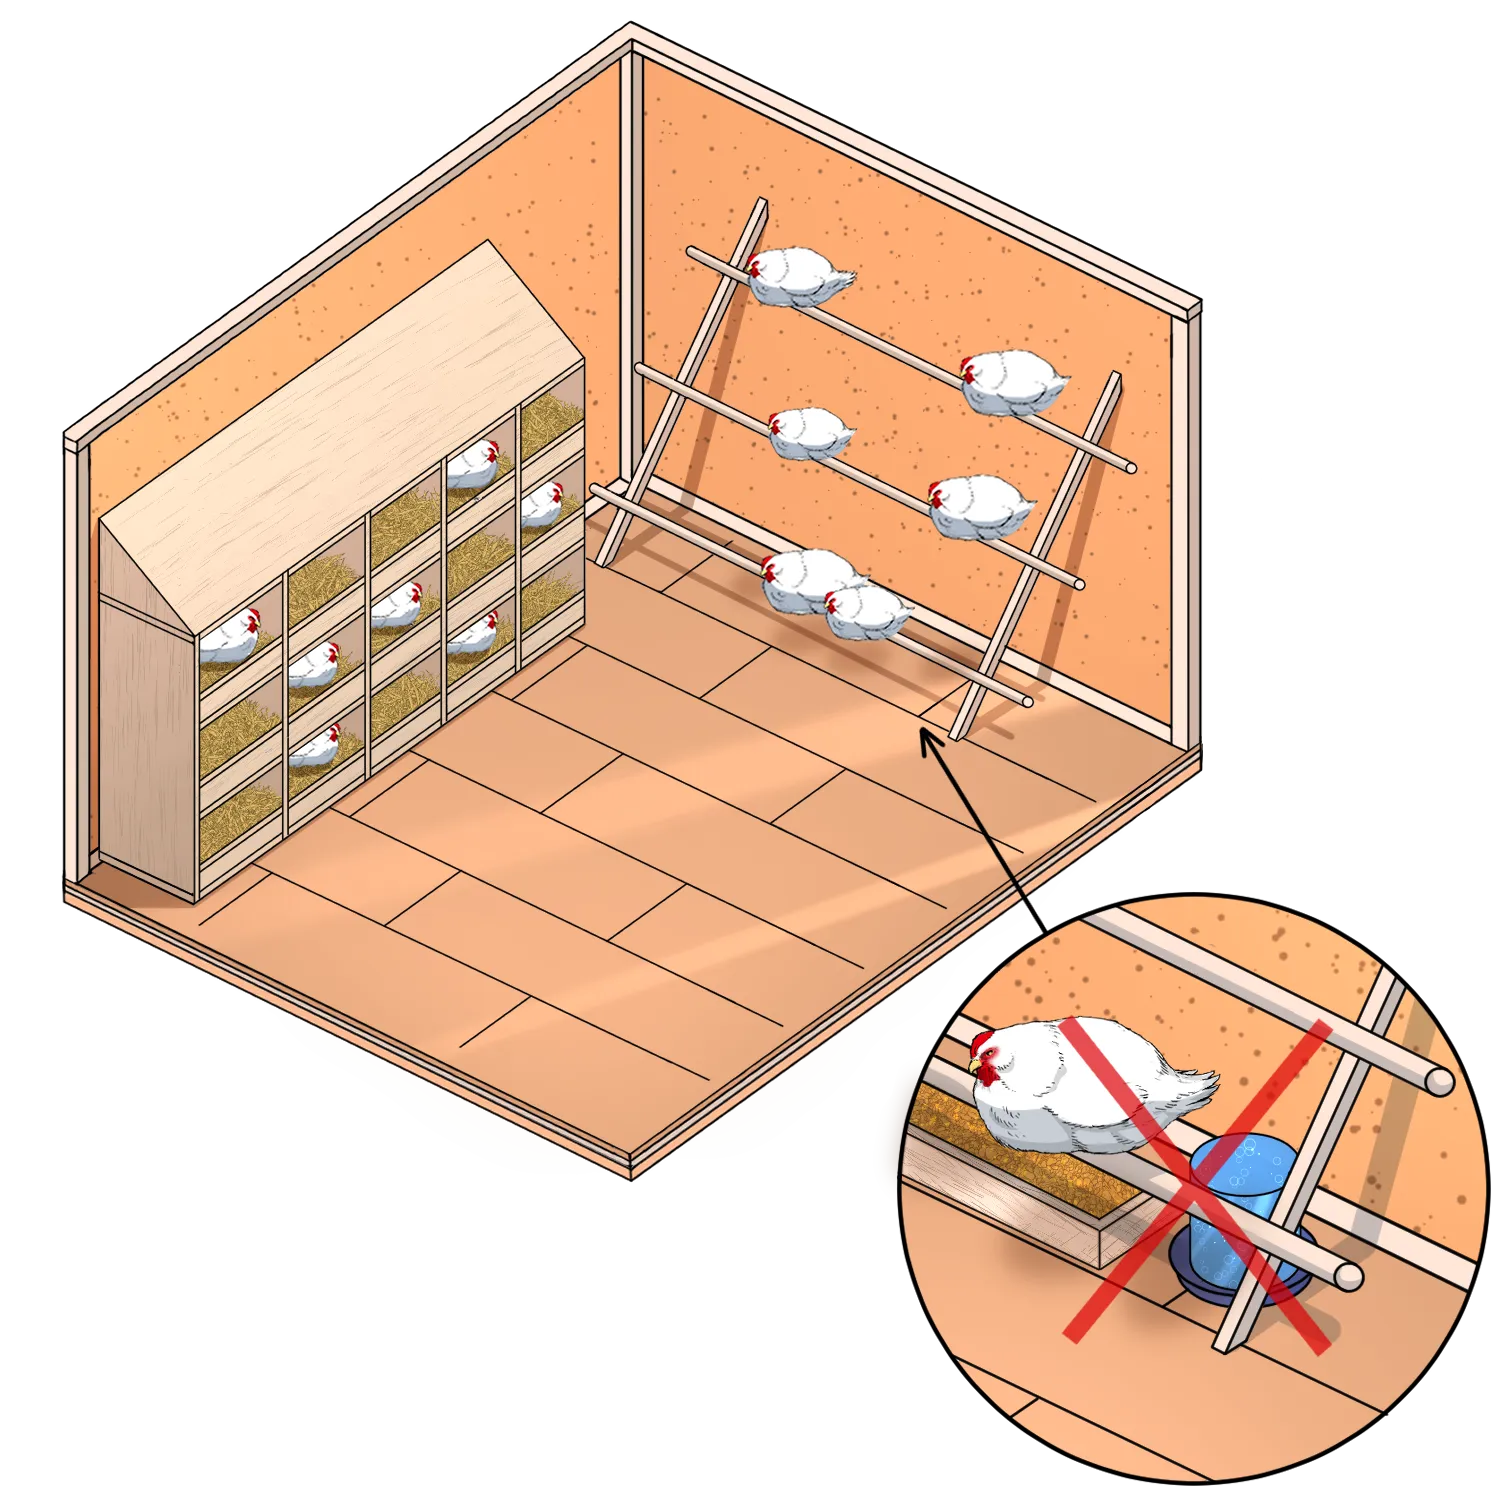
Inside the coop, roosts are mainly to provide your chicken with a comfortable sleeping perch. Roosts need to be away from food and water sources and nesting boxes to minimize the chances of the birds defecating into and onto these items.
Unless you have a tiny chicken coop that leaves you with limited options, here are some factors to help you determine the right location for perching roosts.
1. Optimizing Roosting Space
Personal space on the roost is vital, and the capacity of your coop is the crucial determinant of the size of roosting bars you need. Typically, each chicken needs about 6-12 inches of roosting space, depending on the breed you are keeping. The larger the roosting space you provide, the better. They will huddle together in cold weather and spread out during hot nights.
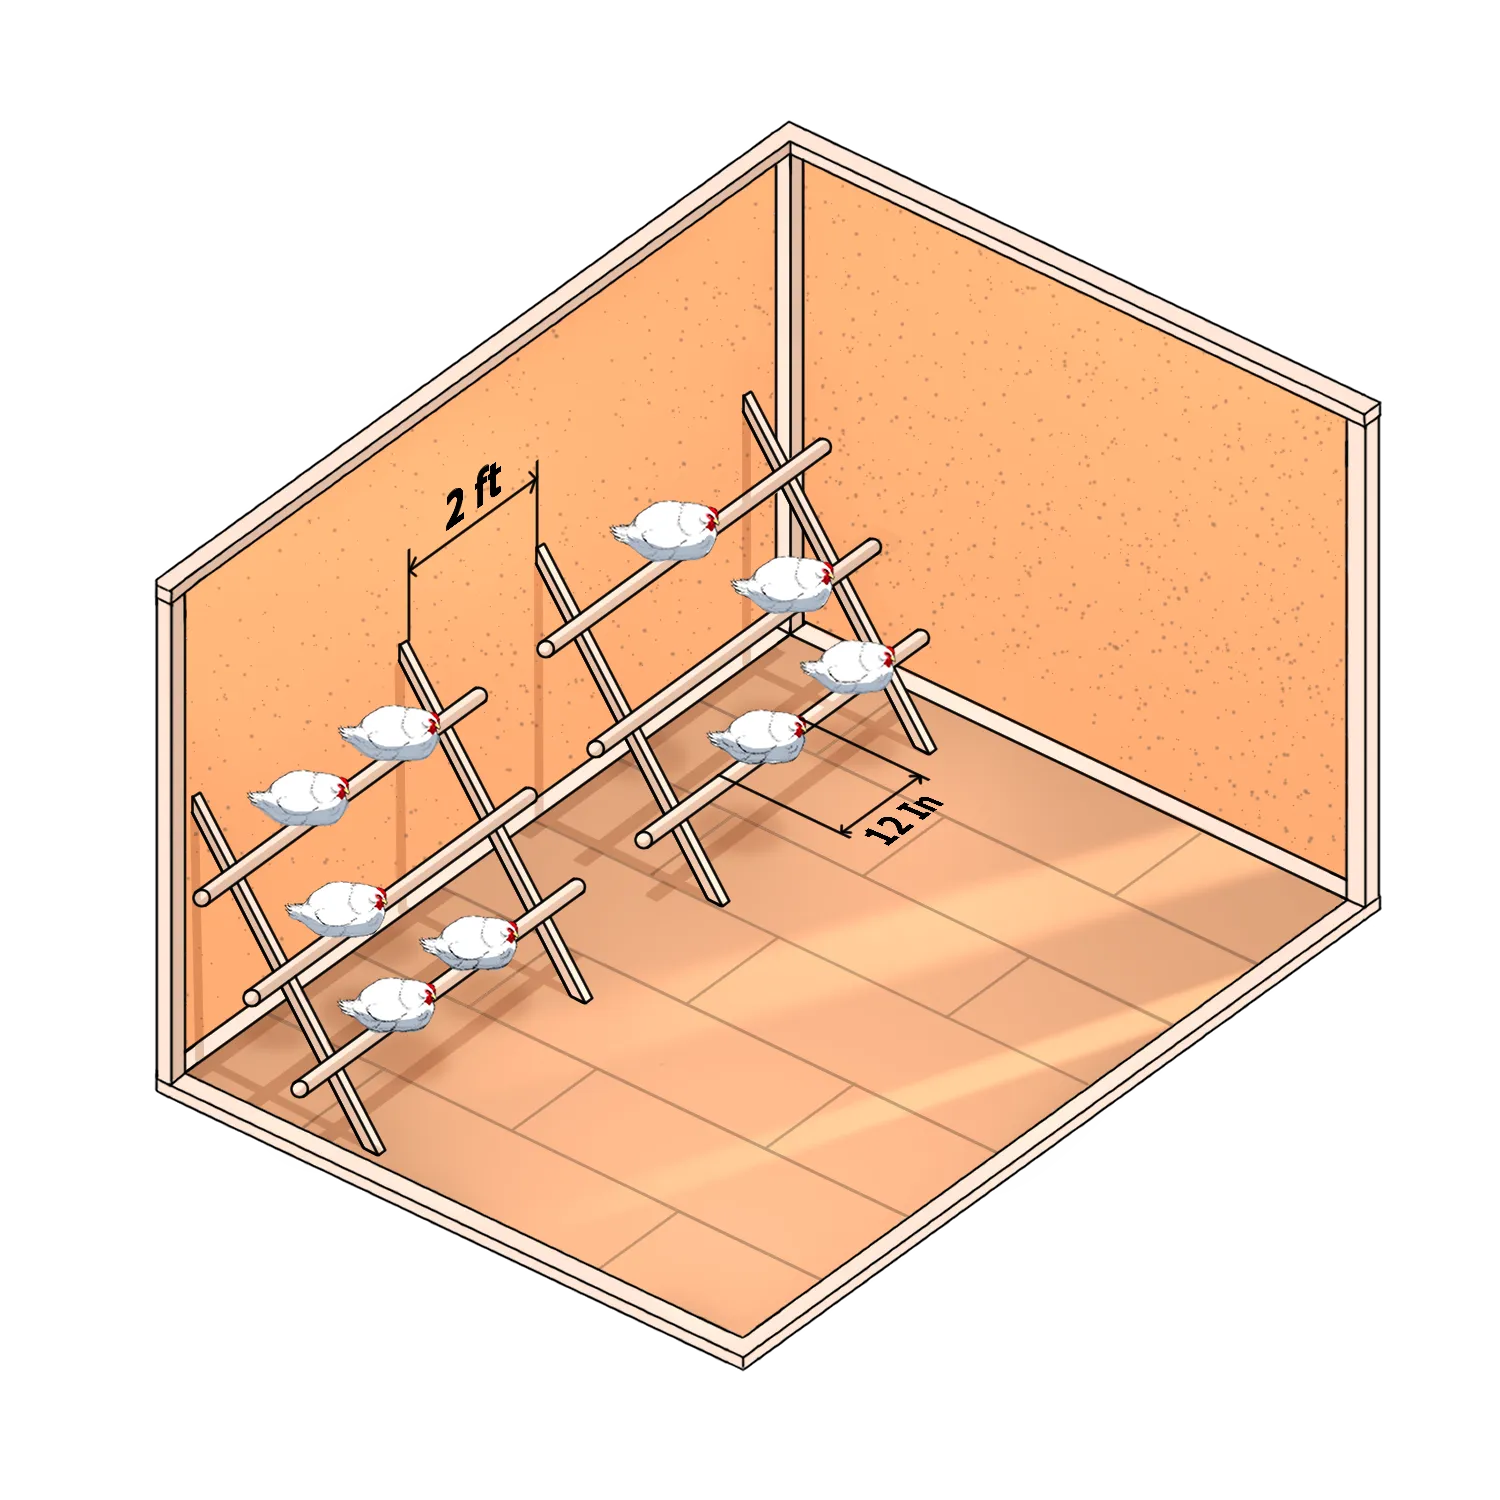
Space roost boards 1 foot apart and 1 foot away from walls to allow your birds enough space to stretch and flap freely when resting.
2. Choosing the Right Height for Roosts
Because of their safety, chickens perch up off the ground for optimal protection from predators. Place first roosts only 18 to 24 inches above the floor to prevent injury to legs when they jump down.
Most people are tempted to build the roosts too high off the floor. Since chickens are poor fliers, they tend to jump and coast off the roosts and onto the floor. If you build the roosts too high, the chickens jumping down from the perch can cause fractors in their hip joints and legs over time. In small coops, don’t set the roost so close to the roof that the chickens can’t fly up, stretch, and stand comfortably.
Tip: You might need a few low roosts if the coop houses chicks.
3. Keeping Your Coop Clean and Tidy
This is arguably the most important consideration when choosing a roost’s location. Chickens do most of their pooping while on the roost, and you don’t want them to soil anything.
As far as your flock is concerned, the space directly beneath perching roosts is always the bathroom. For this reason, you don’t want to leave feeders, waterers, or nesting boxes under the roosts. Also, you will need to clean this area more often.
Note: it is best to install nesting boxes away from the roosts. Otherwise, your birds may be tempted to sleep in the nesting boxes, leading to poop-covered eggs.
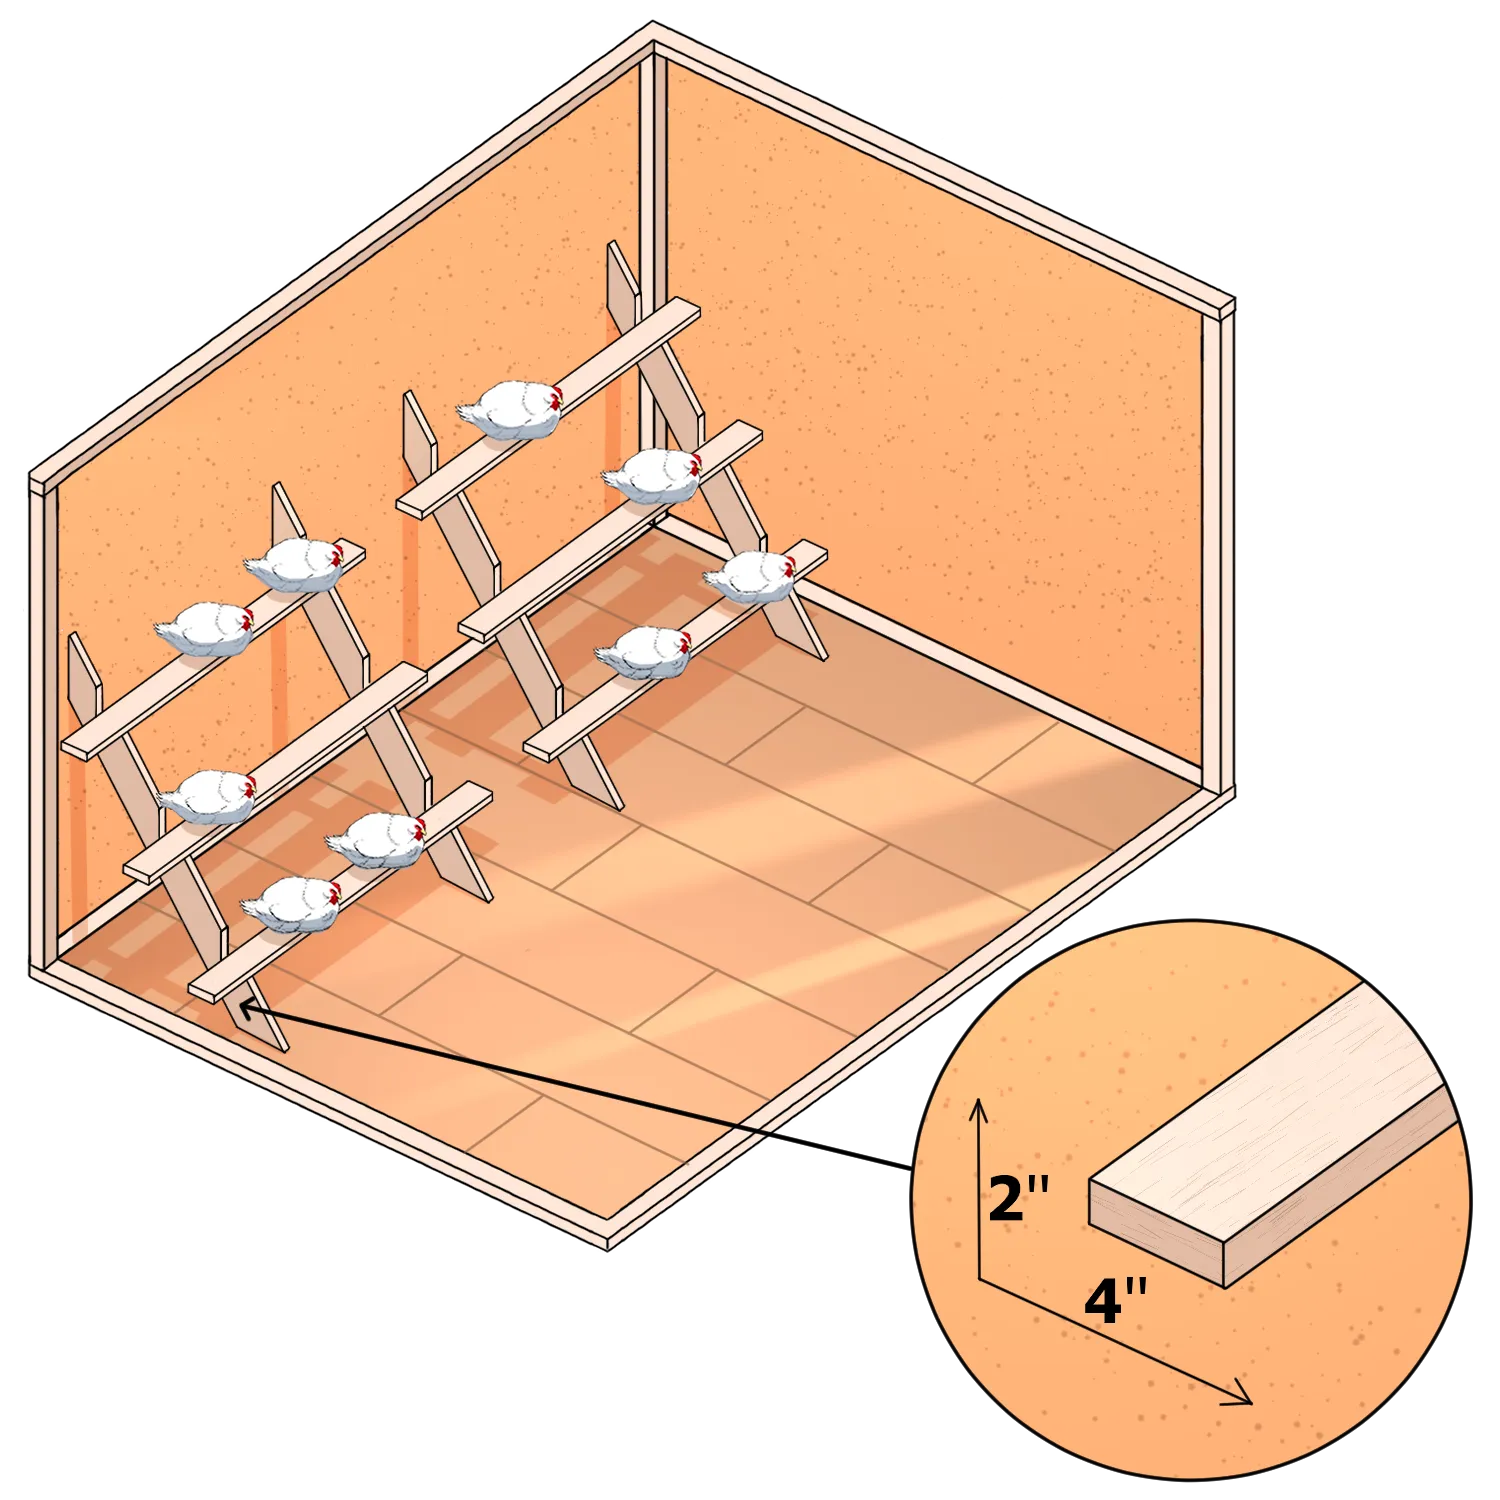
If you plan to break the roosting bars into smaller sections to save on space, make sure not to stack any roosts directly over another. Instead, spread the roosting sections in a stepladder (in a 1-foot back and 1-foot up pattern) orientation, making it easy for the chicken to climb, giving each bird a clear shot from above to the floor below.
There are a few ways to make cleanup manageable, especially under the roost, where much manure will accumulate every night.
Making Roosts with Different Materials
A firm, comfortable perch is imperative to keep your flock happy at night. While you can buy pre-made roosts, you can make your roosts with basic woodworking skills. Wood is commonly used to make perching roosts because it is long-lasting, sturdy enough to hold several chickens, and can be well-cleaned. Wood perches also deliver a natural experience.
Regarding size, roosts should be at least 2″ inches wide, and up to 4″ inches is preferred because chickens sleep flat-footed, and a wider surface will mean better comfort. It is no surprise that 2″ x 2″ or 2” x 4” roosts cut to length are most common.
Depending on your budget and what is at your disposal, you can make roost with these items.
1. Tips for Choosing and Installing Boards
Most chicken owners often make roosts from coop-framing leftovers, which is an excellent way to use those scrapboards. However, if you have a budget for perches, you can invest in lumber and build your birds a decent roost.
Since chickens sleep flat-footed, they can balance and cover their feet with their feathers and breast if the board is wider, which helps keep the delicate toes warm. This can be very beneficial when the temperatures drop significantly and can go a long way to preventing frostbite.
2. Can I Use Tree Branches?
Some owners prefer to mimic the tree branches that chickens would perch on in the wild. However, remember chickens sleep with their feet flat and roost in very thick branches. Instead of roosts with square-off edges, you can put up round perches.
With rounded roosts, your birds will enjoy a perching experience like other birds in the wild. Thankfully, you can easily find wooden dowels at hardware stores. Just make sure to get dowels at least 2” inches in diameter. This size dowel is comfortable underfoot and sturdy enough to support several chickens. Don’t use anything that might break or warp while your birds sleep at night.
A roost can be any piece of scrap wood, right? If you want to offer an authentic natural experience to your birds, wide tree branch perches are the way to go. With a tree branch as a roost, your bird will perch on a truly authentic and natural crossbar. To make roosts using tree limbs, you just need to cut them to size and install them.
Whatever you use to make roost, ensure it is strong and wide enough to offer desirable comfort. Ideally, you want to offer your chicken at least a 2-inch-diameter branch, where they can easily balance and happily perch.
Unless you are constrained by space, having one roosting area where all your birds can perch together is a good idea — chickens like roosting together. All in all, it is important to provide enough space for each chicken to have its own personal space on the roost.
Tips for Building and Supporting Roosting Bars
Roosts need to be solid and stable. Otherwise, they may snap, bringing all your chickens down, which can cause injuries. That’s why it is imperative to support them.
Regarding building perches, several options exist for securing and supporting your roosts. Like many chicken owners, you should build a freestanding roost rack, a series of bars attached to a self-supported, framed structure so you can move from one spot to another within the coop walls. A movable roost rack can make cleanup easy, especially when cleaning the entire coop.
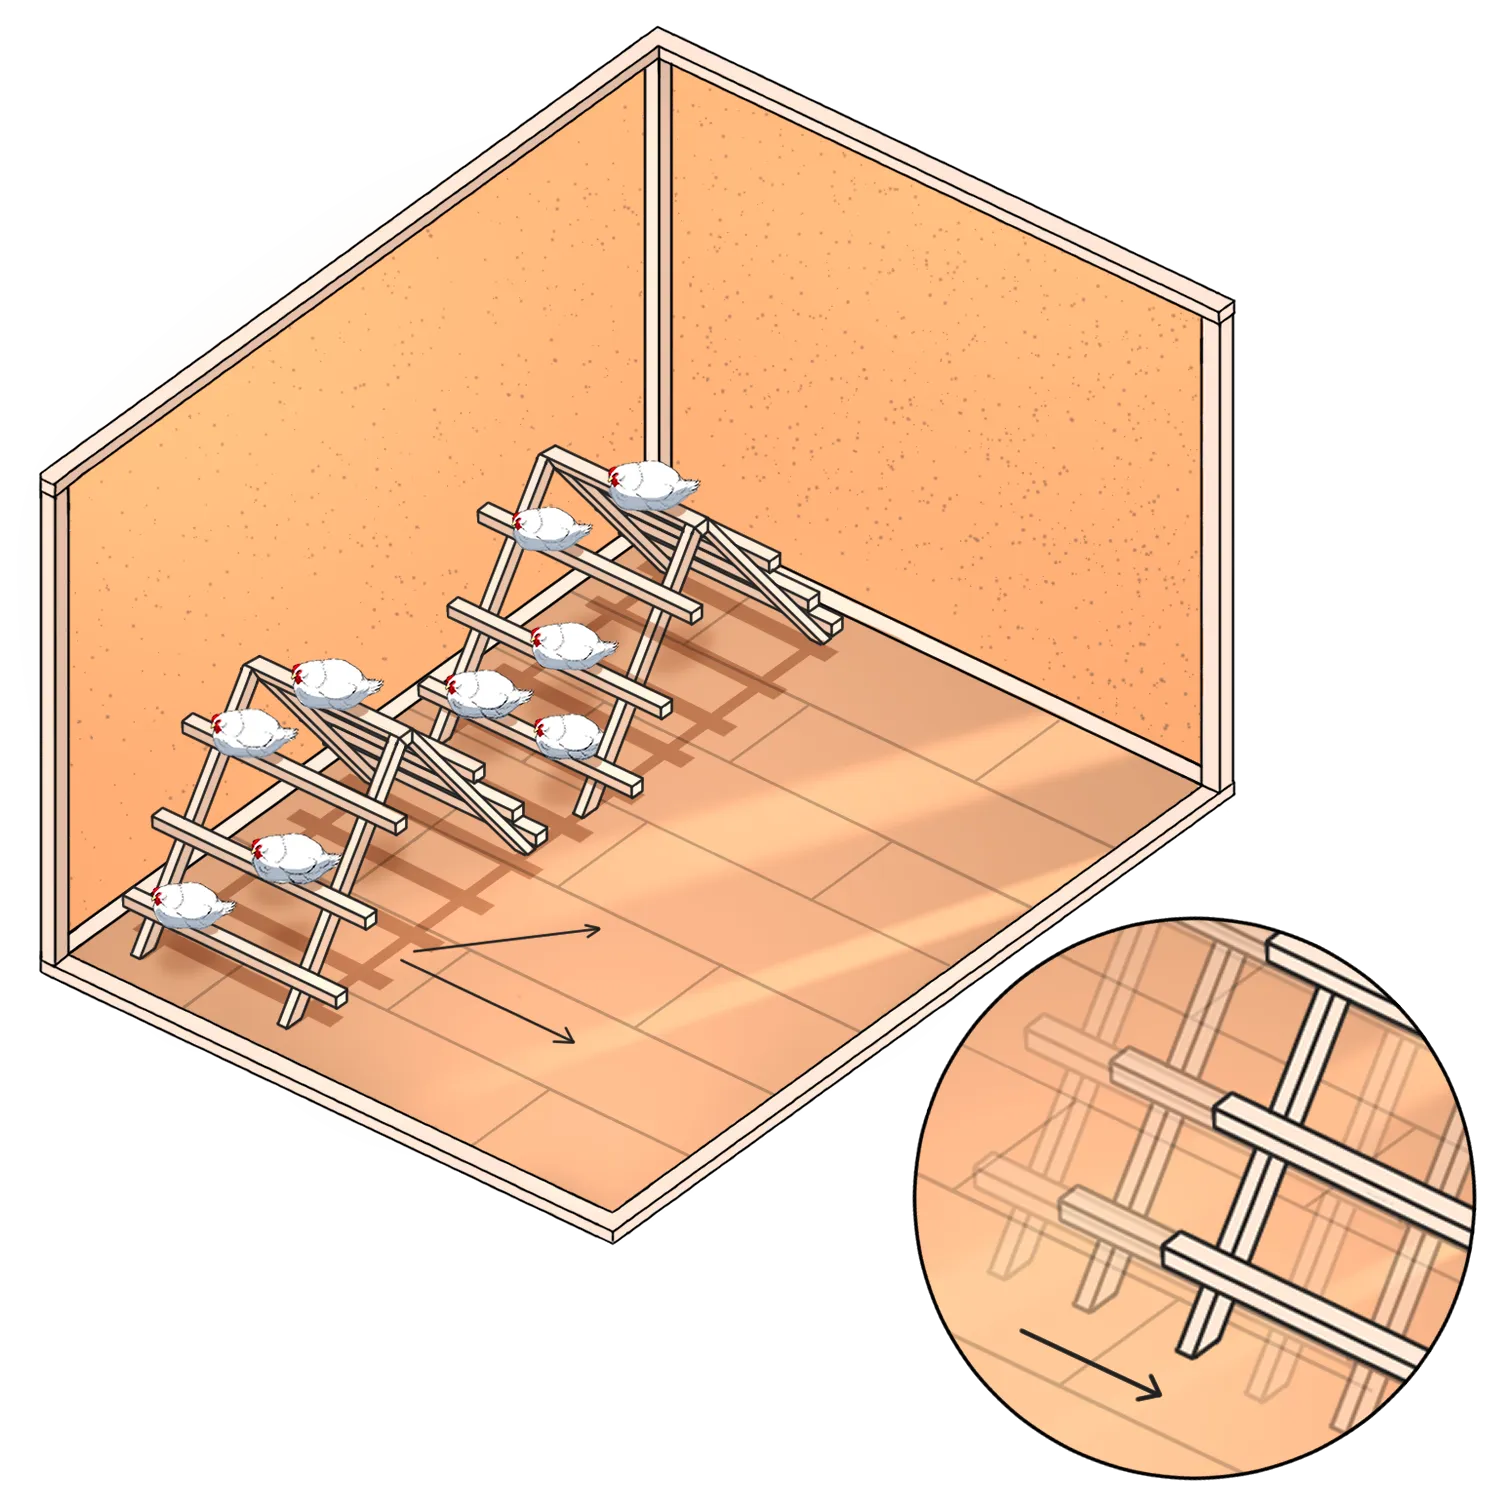
Yet another quick approach to making a regular roost is affixing roost bars in stepladder orientation (1 foot back and 1 foot up pattern).
To ensure stability, you must fasten the roosts using nails or screws through the inclined sides. The legs should also be secured to the floor and at the top into the wall studs.
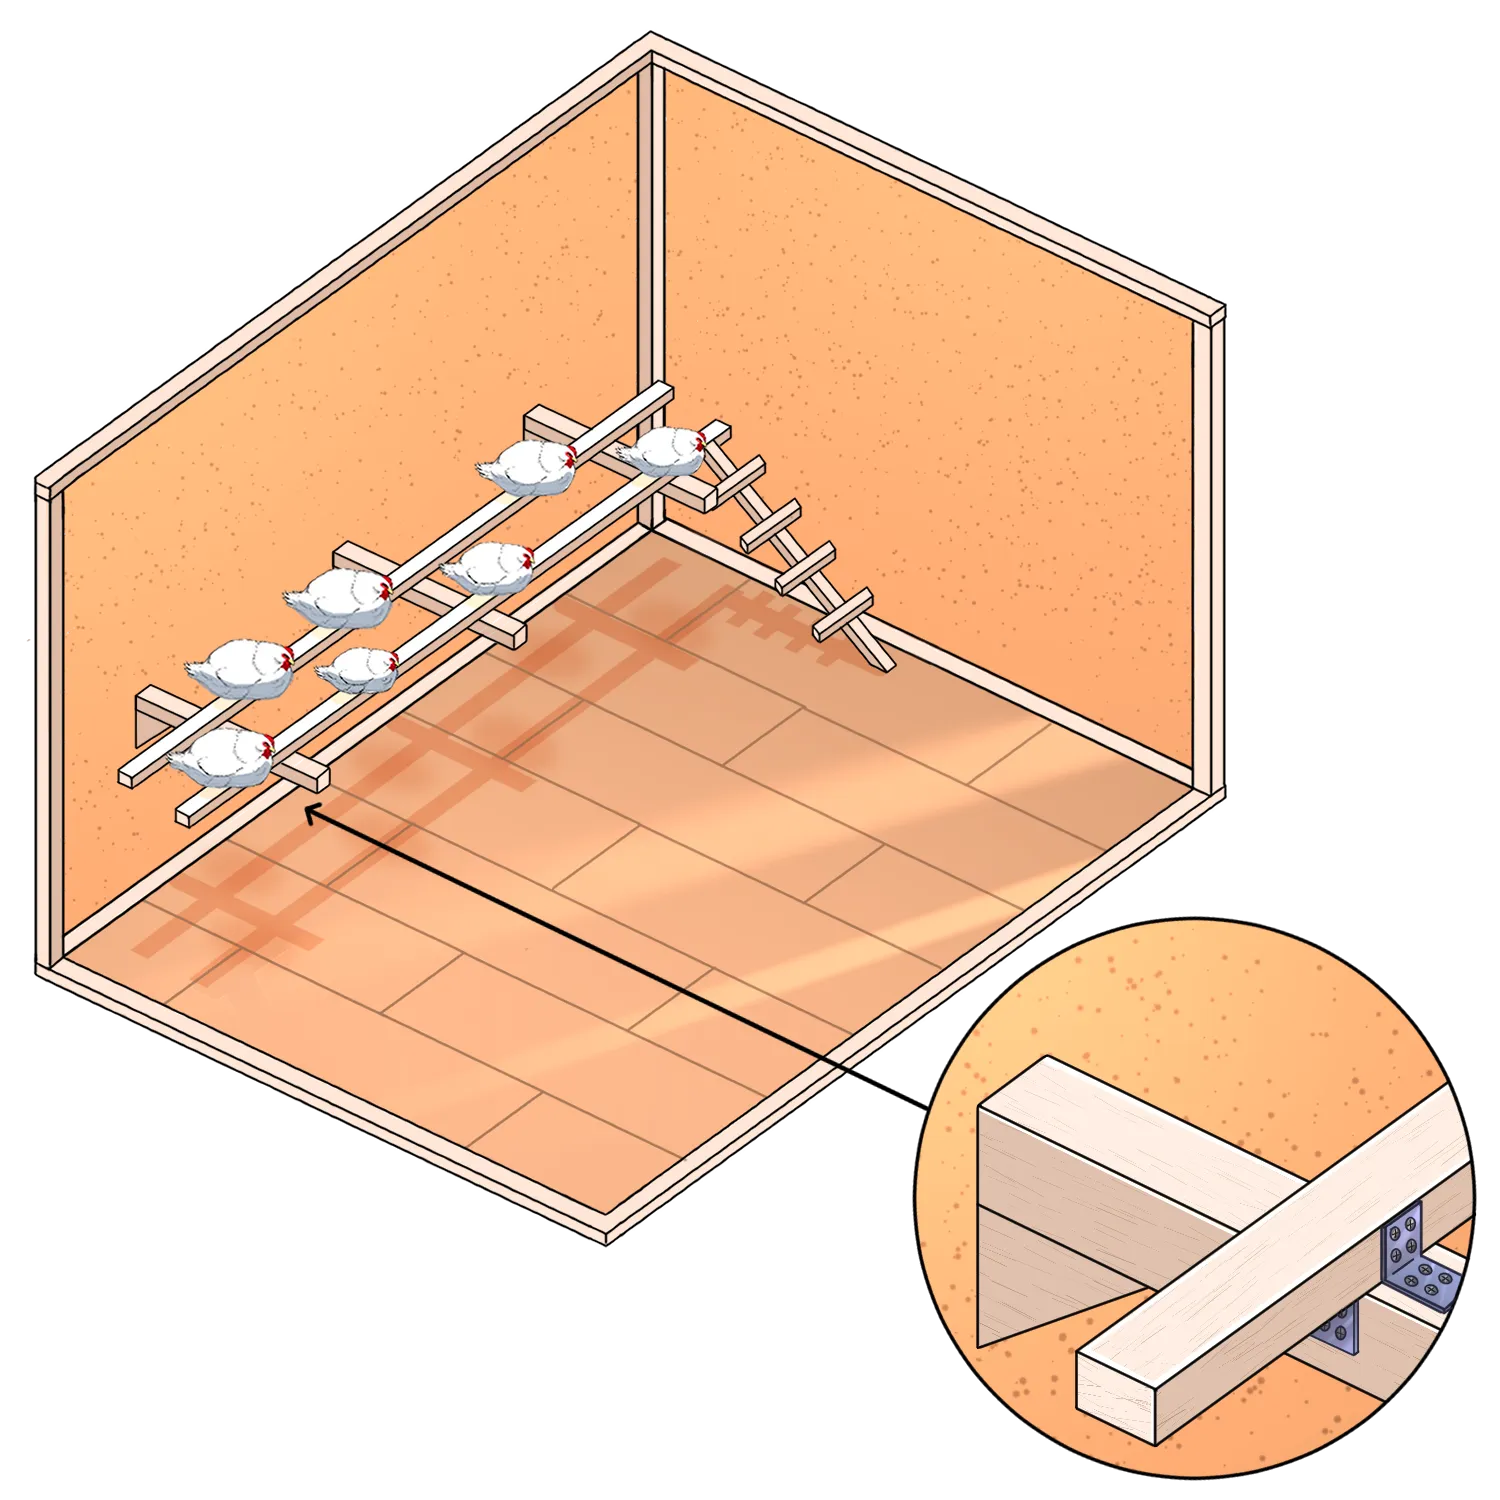
One nail or a screw in each end is often enough for a simple roost that spans the coop’s width. However, depending on the roost’s length, you may want to support it at the center. With this kind of roost, unless you have horizontal panels at an ideal height, you will be toe-nailing through the roost bar into the coop’s wall, so be keen with the fastener you pick. Be careful not to use a nail or screw that will go through the wall, leaving a sharp point on the exterior of the coop, as this can be dangerous. Depending on the material you use for walls, you can drive a fastener from outside the coop, through a wall, into the end of the roost bar. This is an excellent way to avoid leaving a nasty sharp point on the exterior, though trying to align the fastener with the roost can be challenging.
You can also make nailing cleats and mount the roost bar on top of the cleats. Cleats are small scrap boards securely affixed to the wall with short fasteners on which you can install your roost. After mounting the cleats, the bar is fastened to create a place for the birds to roost and relax at night. This can be a great approach if you install a roost along the coop’s longer side. With several cleats to support the weight of the roost, you won’t have to worry about the cleats warping.
No matter the approach to secure your roost, ensuring it is appropriately affixed for wobble-free mounting and dismounting is imperative. Ideally, you want to make your roost sturdy enough to provide comfort and stability that your flock will appreciate but remain removable, to remove and clean it occasionally. Critters like mites hide in crannies of perches, so removing your perches to inspect and clean them can go a long way to ensuring the health of your birds.
Note: Depending on your roost’s material and length and the number and size of chickens perching, you may need to add some support underneath at reasonable intervals. The idea behind underpinning is to keep the roost from sagging or bowing, even when the entire flock is on it simultaneously. A sagging roost presents dangers in many aspects.
Building a Nesting box
A nesting box is necessary if eggs are one of your primary goals for keeping a flock of birds in your backyard. With a well-designed and positioned nesting box, you will gather freshly laid eggs each morning.
The small cubbies offer a protected space for your birds to lay their eggs. Nesting boxes also allow you to collect eggs conveniently without cracking or breaking any harvested eggs.
Having nesting boxes is also another way to help your birds adapt to their coop. Even if you release them outside to run, birds become disciplined and know where to lay eggs. Finding poop in a nesting box or on a bird preparing to lay an egg is infrequent. Cleaning out or adding nesting material like straw or pine shavings is important to prevent egg breakage. While some finicky birds may choose never to lay eggs inside the boxes, safely installing nesting boxes inside a coop is always prudent. This section will cover more on nesting boxes, as well as alternatives to building a nesting box.
Size Matters
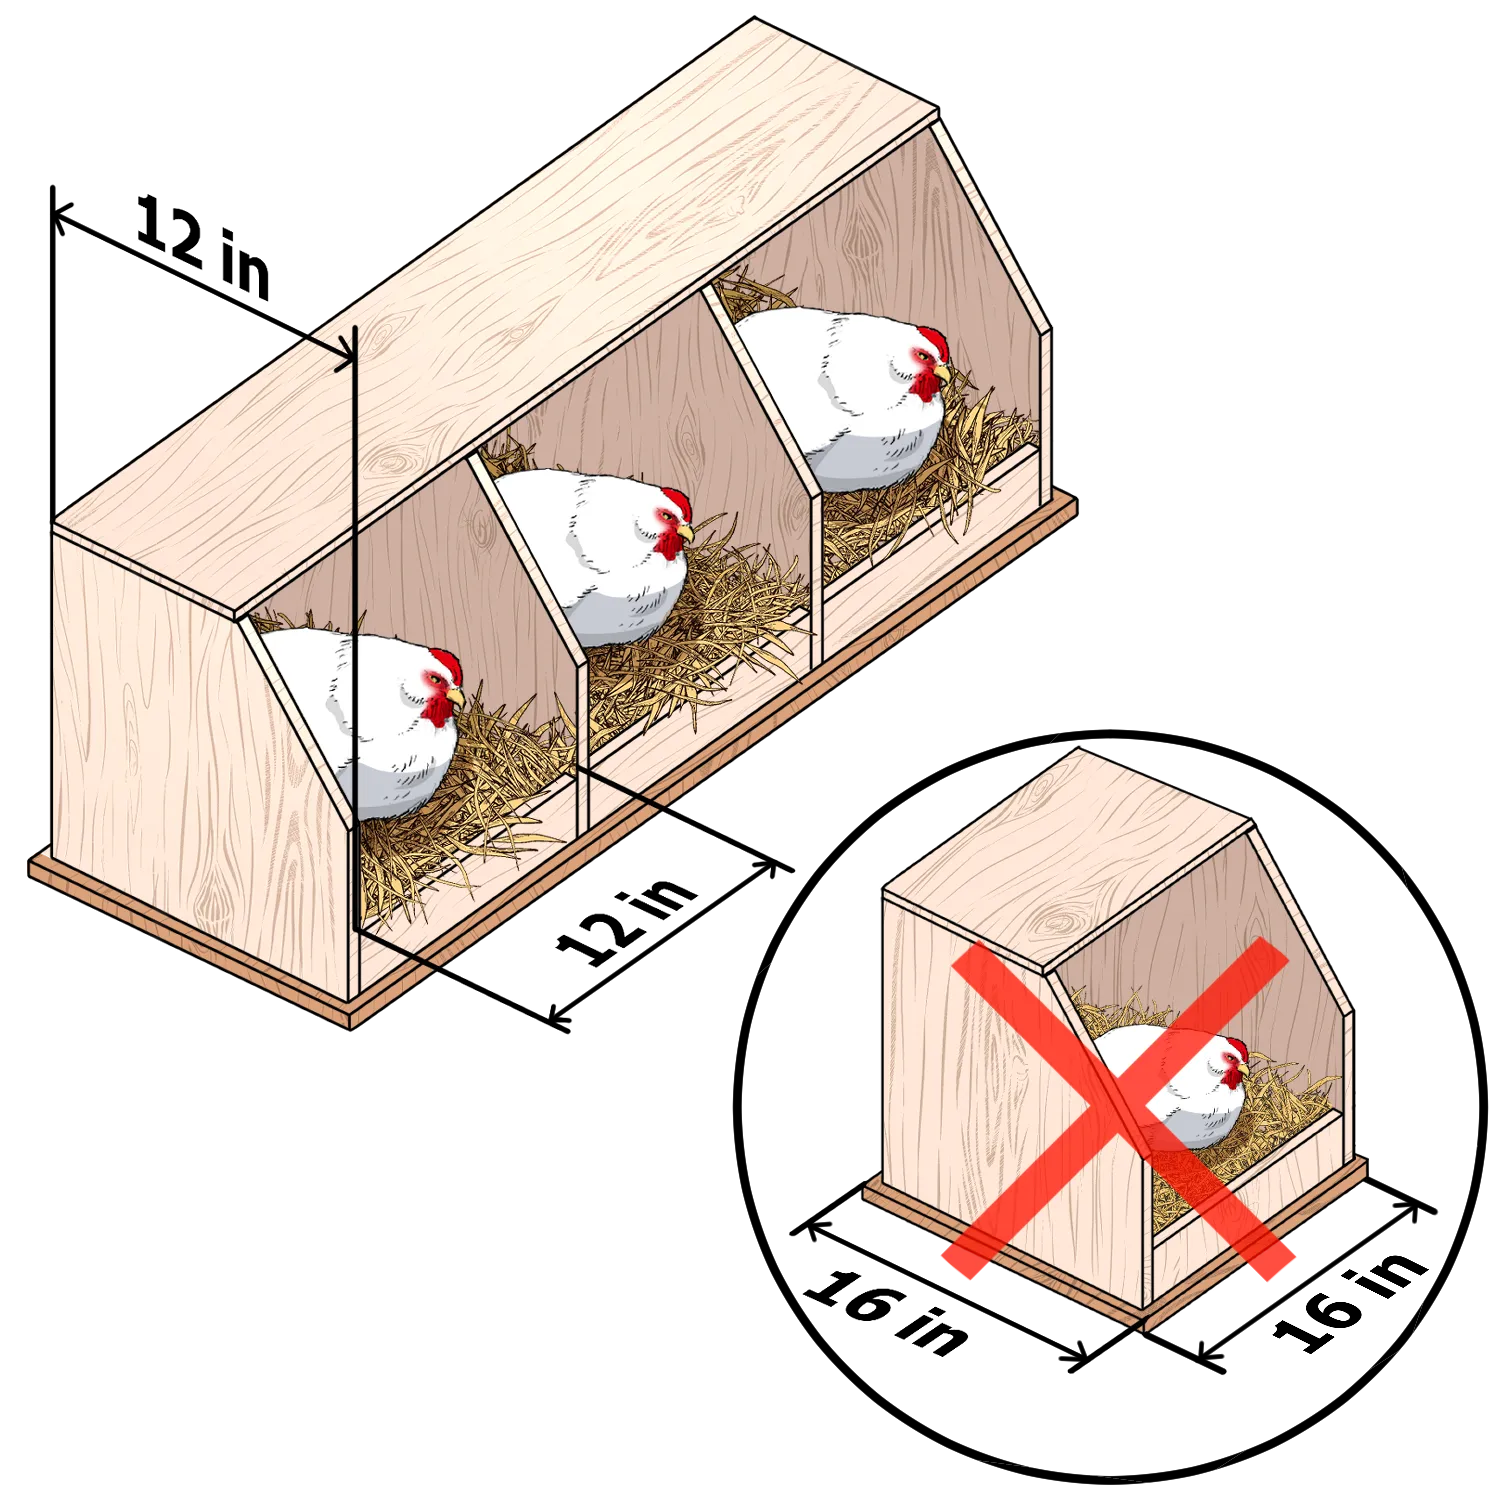
Each nesting box should be comfy and big enough to house a single chicken. Typically, nesting boxes need to be at least 12×12 inches.
However, if you keep large-sized breeds, you need to make the boxes about 14×14 inches to accommodate their larger bodies.
The critical point is to give the birds enough space in the box to turn around easily when getting in to lay eggs and move out after they have laid.
Even though a large nesting box is ideal, you don’t want to make things too big. An extra large box will allow more than one bird inside, which can lead to broken eggs.
Generally, any nesting box that measures more than 16 x 16 inches is too large and can contribute to increased egg breakage. Another thing that helps determine the size of a nesting box is the breed of birds. Small breeds and bantam chickens can comfortably lay eggs in a smaller nesting box, whereas larger breeds need relatively large boxes.
How Many Boxes Do I Need?
While all birds can lay eggs simultaneously, that’s seldom the case. Too many boxes in your coop are considered a waste of space. It is not uncommon to have unused boxes. Chickens do not spend the entire day nesting, just as you don’t spend all day in bed. You can have one nesting box used by three or four hens. This is especially true considering that a good hen will always leave the nesting box once it has finished laying an egg and allow another chicken the opportunity to lay. Chickens are birds of habit, and once they select a box to start laying their eggs, they seldom change to a different box during their laying cycle.
The number of boxes you need will depend on your flock size. It is recommended to have at least two nest boxes for the first four (4) hens and then add one nest for every additional 3-5 hens in the flock. When building your chicken coop, you want to include enough boxes for the flock size and make them attractive to hens.
If you deny your hens space to lay eggs. You will likely find several broken eggs all over the coop and in the nesting boxes and promote egg eating by the flock. While building a separate nest for each individual chicken is not necessary, you want to ensure that each chicken gets enough space to lay eggs.
A prudent chicken keeper will always ensure that the coop size and the number of egg-laying chickens are proportionate to the nesting boxes. (Not too many to fill up space or go unused and not too few to deny some hens space to lay eggs.)
Creating Comfort through Proper Positioning
The placement of nesting boxes is also vital to functionality. When positioning nesting boxes, placing them together in small groups is recommended.
You may be tempted to spread them all around the coop, but that will only occupy more space and disorient the social egg-laying aspect of hens. For your boxes to serve their purpose best, you can choose to have one box with several compartments or have many boxes and arrange them together. You can even stack up to three boxes to save on space if they are correctly installed for stability and performance.
Notably, if you must stack more than three boxes, ensure they stay within four feet high and have a walking stick in front of the nests for easy access.
Make sure the nesting boxes are not placed on the floor or near the roosting area. This increases traffic, allowing the dirty litter to enter the nest, and may result in contamination of eggs and increased egg eating.
Another thing that will help you choose a location for the nesting boxes is natural light. Hens love nesting in a dark area, where they presume to be hiding. Avoid putting the boxes near or directly opposite the doors or windows, as these places receive more light. You can also find a corner of the coop that receives less light and organize all the nesting boxes there. If you have darker areas in the hen house, the chickens may lay their eggs in that area instead of the nest.
In the most recent coop designs, it is not uncommon to find coops with nesting boxes built on the side of the coop. These boxes are designed to be a small outer extension of the entire coop and can be accessed by the chicken inside while the owner gathers eggs from the outside. This is made possible by having a small door-like extension on the nesting box positioned on the outside. You can also cover the box with a hinged roof, which you open to gather the eggs without disturbing your hens.
The design should be featured in your coop construction plan if you incorporate an exterior nesting box. You want to attach the box to remain firm for longevity.
With protruding nesting boxes, you need to cut out the frames in a way that will leave enough space for the box to be fixed. Precisely, leave studs 2′ 5½” apart between two boxes, and this space will allow you to easily slide into the box without cutting out other studs.
With the exterior nesting box, it is essential to add a lockable lid to help thwart any four-legged egg nappers and predators. Also, install weather stripping and roofing shingles to block out rain, as it will keep you from dealing with annoying dirt in your coop when rainwater flows in and messes up the bedding and egg-laying mats.
Be simple and go for the simple plans – A flap of rubber lining or plastic sheeting works fine, and you can easily find one. You can also divert rainwater by installing a length of aluminum flashing, which you can find at any home center or lumberyard.
Comfortable Egg-Laying Beddings for Hens
Hens love the comfort and will reward you well if you offer this comfortable space for them to lay eggs. Like giving birth, egg-laying is not simple; some comfort can ease the situation.
Loose straw and soft pine shavings are the most used materials for chicken bedding. Ideally, good bedding material is meant to keep the eggs clean and intact as well as maximize comfort for your lovable birds.
Importantly, keep your bedding material loose and about 4 inches deep. Loose beddings are ideal for hens to kick around and reposition as they prepare to lay eggs. And be sure to rearrange, replenish, and clean the beddings often. A well-cared-for nesting space means clean and unbroken eggs.
Tip: You can use dirty bedding to prepare compost manure. Mix it with other organic matter and prepare a rich fertilizer for your garden.
Where to Source Beddings for nesting boxes
The different hen beddings can be sourced at different places. Here are some of the common bedding materials and their sources. Do not use yard waste like old leaves, grass clippings, or pine needles that easily mold and can cause odors in your eggs.
- Pine shavings: They can be easily found in nearby stores packed in convenience bales at a lower price.
- Straw: Straw is loved by chicken keepers but is also a popular bedding material for other animals, including horses, cows, and pigs. You usually will need to buy at a local farm store.
- Nesting pads: Modern nesting pads can be found in most hatcheries or online stores. Some people cut indoor-outdoor carpet to place on the floors of the nests to add cushion. All of these are inexpensive, washable, and reusable. But they must be cleaned from time to time.
Can you Buy New Nesting boxes?
You can quickly get ready-made nesting boxes, but they are no better than wooden DIY boxes. Regardless, you can mount these manufactured nesting boxes on the coop wall or strategically place them within the coop.
Designing and Building a Safe Ramp
Most chicken coops have a small door for the birds to pass in and out of the shelter. However, these access doors are often located off the ground because of design details.
If you are a first-time coop builder, you might have just realized that the access to your coop is way too high for your chicken to fly/jump into place, and that’s when a ramp becomes very handy.
Building a hen house ramp should be easy, but you need to give it some thought before starting. There are a lot of variables that go into making ramps.
While a chicken coop ramp is a simple board that stretches from the ground to the door, designing one can be tricky. You need to decide on the slope, width, and length. As well as whether or not the ramp needs small cleats so the chickens can easily walk up and down the ramp without slipping. Bird tendons are very easily injured from sudden slips on slippery ramps. Finally, fasten in a way that will not interfere with closing the door at night to protect them from predators.
When it comes to designing and constructing a chicken ramp, there are no hard or fast rules. Even so, enthusiastic chicken growers have settled on a few generalizations that hold in most circumstances. Make sure to understand these tips before building your ramp:
1. Getting the angle right
The ramp’s angle with the coop is the most crucial aspect when designing a ramp. No matter how high off the ground the door is, the ramp should never be more than 45°.
If you want to construct a ramp without cleats, make it long enough so that the angle of the ascent is 30° or less. For steeper ramps inclined 30° to 45°, place cleats every 4 to 6 inches. The cleats should be at least ¾ inch wide x ¾ inch high in size. Generally, the steeper the ramp, the closer the cleats must be. Some chicken growers will put cleats 3 inches apart for stability and comfort.
Fastening extra roofing singles to the ramp surface can also give the birds the needed traction.
2. Ideal width
A henhouse door and ramp should be at least 8 to 12 inches wide. Anything less will be uncomfortable for your chickens.
3. What length for a chicken coop ramp
You don’t have to worry about the length when constructing a chicken coop ramp. Your ramp can be any length; pay attention to its angle with the coop door. The more elevated the coop door is, the longer the ramp will be.
Use a staircase instead
Some chicken growers strongly believe birds prefer a series of stairs to an angled ramp. If your ramp is too steep for your chickens to navigate, consider building a makeshift staircase.
Placing Feeders and Waterers
Chickens always need to have access to food and fresh, clean water. Chickens can spend much of the day rummaging for earthworms, insects, and vegetation. It is imperative to have a dedicated feeding location for your flock. Chickens need a steady, balanced diet and water supply to maintain optimal weight, feather condition, and egg production. For this reason, it is vital to determine where to place your feeders and waterers when building your chicken coop.
So, where should you put chicken feeders and waterers?
When it comes to finding an ideal place for your chickens to eat and drink, the good news is that you don’t need to build a new structure. The most important thing is to buy the best feeders and waterers you can afford.
Regarding placement, it is advisable to place your feeders in the coop and waterers in the fenced outside aviary. Inside the coop, your feed system can keep the food dry. If outside, food can get wet and mold. Also, when the chicken feed is outside, it will attract rodents, wild birds, or other animals, threatening your birds’ health and safety. In the long run, building automatic feeders and waterers and strategically placing them will give your flock easy access to feed and water and help you save time.
Placing chicken waterers in the chicken run is an easy way to prevent dampness in the coop. This is vitally important, considering that dampness creates ammonia and ideal breeding conditions for pathogens, which can threaten your flock’s health.
However, placing your chicken feeders and waterers inside the coop during winter is intuitive. During inclement weather, your chickens will most likely spend more time inside the coop, so bringing the waterers inside will ensure they have access to feed and water. Water placed outside in winter can also freeze, leaving your flock with no access to water.
No matter the season and where you place your coop, you can benefit from automatic chicken feeders and waterers. Although they are relatively costly to make or purchase, they pay for themselves as they reduce time as well as feed and water wastage.
One key factor to consider when placing the feeder is that it attracts a range of wildlife, including wild birds, mice, rats, and raccoons, which can contaminate the feed and prey on your chickens. For this reason, it is imperative to predator-proof your chicken coop to keep uninvited guests off your chicken coop and run.
Keeping your chickens clean with a dust bath
If you’re new to the chicken-keeping hobby, bumping into a dust-bathing chicken can be alarming. Surprisingly, it turns out that dust bathing is the chickens’ natural relaxing behavior – chickens shuffle their wings and feathers in the dirt to stay clean.
Dust bathing serves many essential roles in keeping chickens healthy and clean. That’s why providing your flock with opportunities to bask in the glory of dirt is essential.
What is a dust bath, and why do chickens need it?
Chickens roll and flap around in fine dirt. This innate behavior is called dust bathing, and while it seems unconventional, it is enjoyable for them and keeps them clean.
A dust bath is a place where your chickens indulge in dust bathing. If you’re a beginner chicken grower, here are reasons why you should provide a place for your chickens to dust bathe:
- Skin health: Dust bathing exfoliates chickens’ skin and prompts healthy skin
- Oil control: Chickens have glands that produce oil to keep their feathers clean and water-resistant. When dust bathing, the dust helps to remove excess oil and moisture.
- Parasite control and prevention: Chickens are susceptible to mites and live invasions, which can take a toll on their health. Dust bathing helps smother insects and parasites living on your chickens. The dust also makes chickens’ feathers less desirable for parasites.
- Helps keep them cool: If you’re a seasoned chicken grower, you might have noticed that sunbathing and dust bathing go hand in hand. Under the sun, only the layer of dust heats up. As the chickens roll and shimmy down into the deeper dirt, they find much cooler layers, which helps them stay cooler.
Since chickens naturally want to take dust baths, they will make holes in the ground to create their own dusting areas if you don’t provide dust bathing areas for them. Ensuring they have a place to dust and bathe will keep them out of your well-maintained landscape.
Making a dust bath for your chickens
Whether you keep your chickens confined to an outdoor fenced area or occasionally allow them to free range, ensuring they have a place to dust bathe is of utmost importance. Outside the run, your chickens will naturally choose a spot that feels safe or has an element of protection nearby. This might be near shrubs or at the base of large trees.
If you confine your birds to an outdoor run, a dust bathing area will satisfy your chickens’ natural behavior and help ensure their health. Thankfully, making a chicken dust bath is not an exact science.
Here are steps to make a dust bathing area:
Step 1. Repurpose a suitable container
While you can make a dust bath box from scrap wood, it is economical to repurpose any suitable container available. A container to hold dirt where your chicken will bathe should be low enough that chickens can effortlessly climb in and out but tall enough to contain the dust bath ingredients. Four to six-inch sides are ideal. Old tires, shallow bins, and unused children’s sandboxes can serve well. If you’re on a tight budget, you can use logs and large tree branches to contain the dirt.
When choosing the container to use as a dust bath box, remember that chickens don’t like being confined within parameters when dust bathing. Dust bathing is also a community activity. For these reasons, choose a container that can hold at least four chickens at a time.
Step 2. Add dirt or sand
Loose, dry dirt is the base ingredient for a dust bath, but sand also works well. Soil from your garden can be the most economical way. After all, that’s where your chickens would dust bathe if they free range. Alternatively, you can buy a bag of topsoil or sand from the nearby store. Make sure the soil is free from fertilizer, chemicals, and vermiculite.
Step 3: Mix wood ash or diatomaceous earth into the dirt
Wood ash is an excellent addition to your chicken’s dust bath, as it can help control external parasites. Even better, you don’t have to filter the small chunks of charcoal — charcoal introduces vitamins and valuable minerals into the dust bath, which your chickens can benefit from if they nibble on the charcoal when bathing.
Diatomaceous earth also helps kill external parasites. However, it should be used in moderation as its fine silica particles can potentially cause lung irritation.
Additional ingredients to consider for your dust bath
- Lime – Helps minimize odor and kill pests
- Ground tobacco leaf – helps repel pests
- Herbs – Herbs like lavender, ginger, mints, thyme, and cinnamon help repel pests
Step 4: Keeping your dust bath dry
If you have a roof over your outdoor fenced area, you won’t have problems keeping your dust bath dry. On the other hand, if you have only covered your outdoor fenced area with hardware cloth, you will need to build a roof over the dust bath to keep it dry. However, the shelter should be installed to allow sunshine to reach the dust bathing spot without letting it get rained on. This is very important as chickens like dust bathing under the sun and may not use a bath that doesn’t receive sun.
Conclusions
Chickens have certain natural behaviors that can only be satisfied if their coops have the necessary creature comforts. During the morning, your chickens will want a place to lay and, during the day, a place to dust and bathe, while at night, they will instinctively roost off the ground for their safety. This guide offers chicken growers of all levels insights into providing their chickens with the comfort they need to live a happy and healthy life.
Frequently asked questions
Is it cheaper to buy or build a chicken coop?
The cost of building versus buying a chicken coop can depend on the size and complexity of the coop, the materials used, and your personal skills and access to tools. If you’re handy and have access to affordable materials, it could be cheaper to build a coop yourself. However, buying a premade coop might be less expensive if you don’t have the necessary building skills or would need to purchase expensive tools or materials.
Was this helpful?
How many chickens can you have in a 3 by 4 coop?
The general guideline is to provide at least 2-3 square feet per chicken inside the coop and about 10 square feet per chicken in an outside run. So a 3 by 4 feet coop (which is 12 square feet) could house about 4 to 6 chickens. This can vary depending on the breed and size of the chickens and how much time they spend outside the coop.
Was this helpful?
How big of a coop do I need for 24 chickens?
For 24 chickens, you’d want to provide at least 48-72 square feet inside the coop. This translates to a coop size of at least 7×7 feet at the minimum, up to 9×8 feet. Keep in mind that the breed and size of the chickens, as well as their access to outdoor space, can affect how much space they need.
Was this helpful?
Can chickens survive without a coop?
Chickens can technically survive without a coop in a temperate environment, but it’s not recommended. A coop provides shelter from the elements, protection from predators, a place to lay eggs, and a safe place to roost at night. Without a coop, chickens are vulnerable to predators and weather extremes, and their health and egg production suffer.
Was this helpful?
Do chickens need heat in the winter?
Whether chickens need heat in winter can depend on the breed and the local climate. Most chicken breeds are fairly hardy and can tolerate cold temperatures if they have a well-insulated, dry, and draft-free coop to shelter in. However, in extremely cold climates, or for certain breeds that are less cold-hardy, additional heat may be necessary.
Keep the coop dry. Moisture is a main factor for freezing chicken combs and feet when the temperature gets near or below freezing temperatures. Cold drafts are the main cause of respiratory illnesses. When you start closing your windows in the fall due to colder nighttime temperatures, close the coop windows to prevent cold drafts.
Was this helpful?
Do chickens like small coops?
Chickens generally prefer to have enough space to move around comfortably, roost, lay eggs, and have some private space. A coop that’s too small can lead to stress, aggression, health problems, and lower egg production. It’s generally better to provide more space rather than less. However, it does not provide so much space that it is hard to keep the coop warm in winter.
Was this helpful?
Do chicken coops need 4 walls?
Chicken coops typically have four walls to provide shelter and protection from predators and the elements. The design can vary depending on the climate and the needs of the chickens. In warmer climates, some walls might be made of chicken wire for ventilation, while in colder climates, all walls should be solid for insulation.
Was this helpful?
Are chickens worth having?
Whether chickens are worth having can depend on your specific circumstances and goals. Benefits of keeping chickens include fresh eggs, natural pest control, the enjoyment of caring for animals, and soil improvement. However, chickens also require time, effort, and money to care for properly. They need a suitable coop and run a balanced diet and protection from predators. Due to economies of scale, your input costs will be higher, and you will never be able to produce eggs or meat at a lower cost than you can buy them in the store. They can also be noisy and cause odors if not managed properly. It’s important to consider all these factors and check local regulations before deciding to get chickens.
Was this helpful?