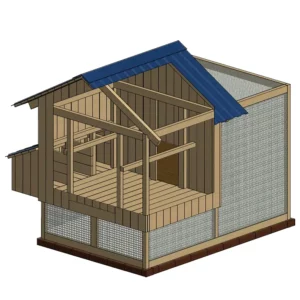
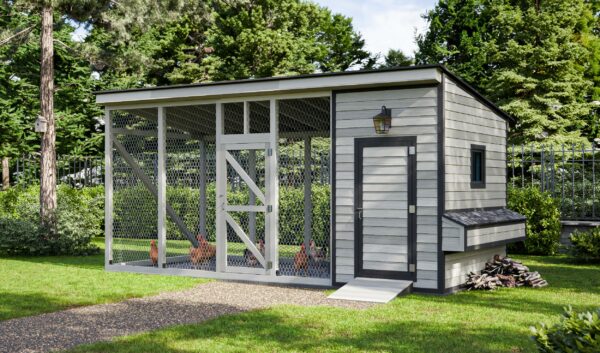
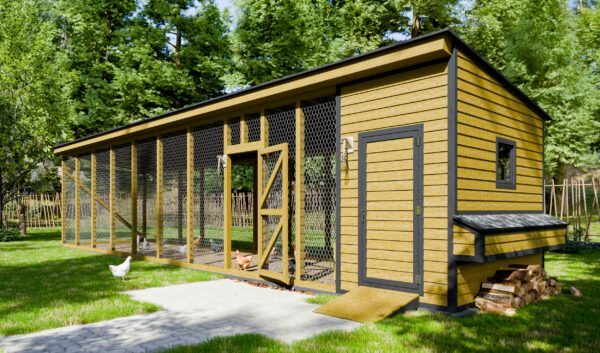
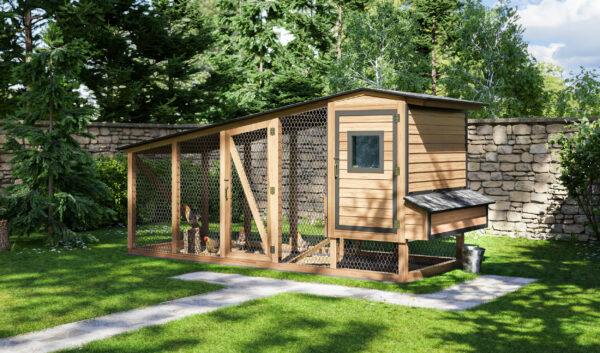
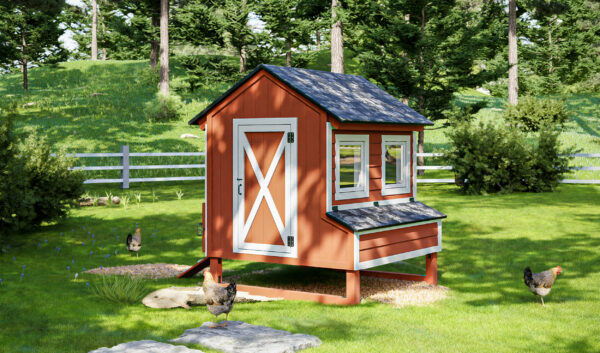
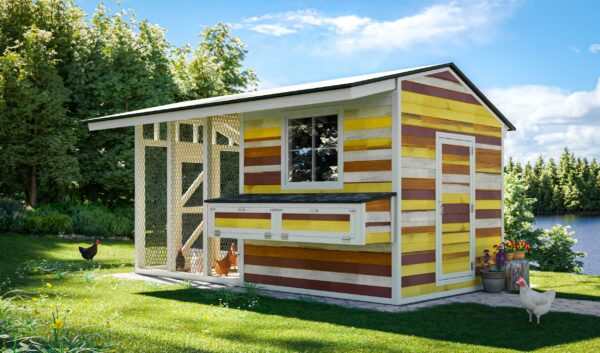
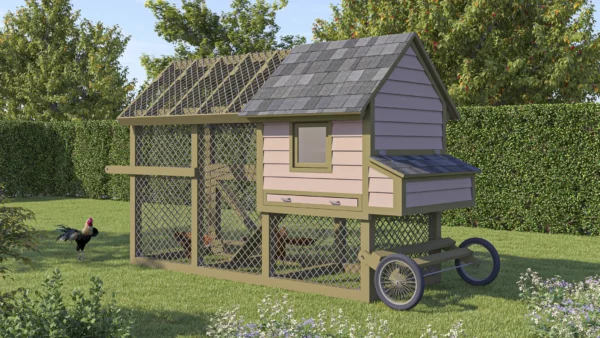
Building a chicken coop can be a rewarding weekend project. This guide will teach you how to build a chicken coop, step by step, with pictures. It is designed to be cost-effective. It has everything you need, including materials, measurements, a cut list, 2D elevations, and detailed assembly instructions.
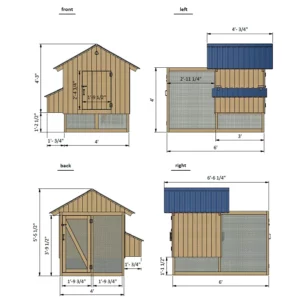
Size and Dimensions
Interior View
Additional Chicken Coop Design Plans
Materials and Cut List
Site Preparation
| Material | Unit | Qty | Size | Note |
| Concrete | lbs | 1 | 60 | |
| Clay bricks | pcs | 36 | 3 5/8″ x 2 1/4″ x 8″ |
Chicken Coop Main Frame
| Material | Unit | Qty | Size | Note |
| Lumber 2 “x3” | pcs | 2 | 2′-9″ | Joists |
| Lumber 2 “x3” | pcs | 2 | 3′-9″ | Joists |
| Lumber 2 “x2” | pcs | 1 | 2′-9″ | Girt |
| Lumber 2 “x2” | pcs | 2 | 2′-4 3/4″ | Girt |
| Lumber 2 “x2” | pcs | 3 | 3′-7″ | Studs |
| Lumber 2 “x2” | pcs | 4 | 4′ | Studs |
| Lumber 2 “x3” | pcs | 2 | 11″ | Studs |
| Lumber 2 “x3” | pcs | 3 | 3′-9″ | Bottom beam |
| Lumber 2 “x3” | pcs | 2 | 5′-9″ | Bottom beam |
| Lumber 2 “x3” | pcs | 3 | 3′-9″ | Top beam |
| Lumber 2 “x3” | pcs | 2 | 5′-9″ | Top beam |
| Wire mesh (1/4″) | sq. ft. | 45 |
Floor and Walls Sheathing
| Material | Unit | Qty | Size | Note |
| Lumber 1 “x4” | pcs | 13 | 3′ | Floor sheathing |
| Lumber 1 “x4” | pcs | 11 | 1′-4″ | Wall sheathing |
| Lumber 1 “x4” | pcs | 11 | 2′-10 1/2″ | Wall sheathing |
| Lumber 1 “x4” | pcs | 8 | 3′-8 1/2″ | Wall sheathing |
| Lumber 1 “x4” | pcs | 6 | 1′-6 1/2″ | Wall sheathing |
| Lumber 1 “x4” | pcs | 1 | 3 1/4″ x 1′-9 1/4″ | Wall sheathing |
| Lumber 1 “x4” | pcs | 10 | 3′-10 1/2″ | Wall sheathing |
| Lumber 1 “x4” | pcs | 3 | 2′-11 1/4″ | Wall sheathing |
| Lumber 1 “x4” | pcs | 1 | 1′-5 1/2″ | Wall sheathing |
| Lumber 1 “x4” | pcs | 3 | 3 1/4″ | Wall sheathing |
| Lumber 2 “x3” | pcs | 2 | 2′-4 3/4″ | Door guides |
| Plywood (5/8″) | pcs | 1 | 1′-1/2″ x 1′-2″ | Chicken door |
Nesting Box
| Material | Unit | Qty | Size | Note |
| Lumber 2 “x2” | pcs | 4 | 10 1/2″ | Girt |
| Lumber 2 “x2” | pcs | 2 | 3′ | Girt |
| Lumber 2 “x2” | pcs | 2 | 9″ | Girt |
| Lumber 2 “x2” | pcs | 2 | 8 1/4″ | Girt |
| Lumber 2 “x2” | pcs | 2 | 1′-1 1/4″ | Girt |
| Lumber 2 “x2” | pcs | 2 | 1′-3 1/4″ | Girt |
| Lumber 1 “x4” | pcs | 10 | 1′-1 1/2″ | Floor sheathing |
| Lumber 1 “x4” | pcs | 11 | 1′ | Wall sheathing |
| Lumber 1 “x4” | pcs | 6 | 1′-5 1/4″ | Wall sheathing |
| Lumber 1 “x4” | pcs | 6 | 1′-1 1/2″ | Partition |
| Lumber 1 “x4” | pcs | 4 | 3′-4″ | Lid sheathing |
| Lumber 1 “x4” | pcs | 3 | 1′-1/2″ | Lid sheathing |
| Roofing profiled sheeting (31 Gauge) | pcs | 1 | 1′-3″ x 3′-4 3/4″ | Lid sheathing |
Chicken Coop Roof
| Material | Unit | Qty | Size | Note |
| Lumber 2 “x3” | pcs | 1 | 2′-9″ | Ridge board |
| Lumber 2 “x3” | pcs | 4 | 2′-10 1/2″ | Rafters |
| Lumber 1 “x4” | pcs | 20 | 4′ | Roof sheathing |
| Roofing profiled sheeting (31 Gauge) | pcs | 2 | 3′-1/4″ x 4′-3/4″ | Roof sheathing |
| Metal roof ridge cap (6″) | pcs | 1 | 4′-3/4″ | Roof sheathing |
Chicken Coop Front Wall Door
| Material | Unit | Qty | Size | Note |
| Lumber 1 “x4” | pcs | 2 | 1′-9″ | Girts |
| Lumber 1 “x4” | pcs | 1 | 2′-5 1/2″ | Cross brace |
| Lumber 1 “x4” | pcs | 6 | 2′-4 1/4″ | Door sheathing |
Aviary’s Door
| Material | Unit | Qty | Size | Note |
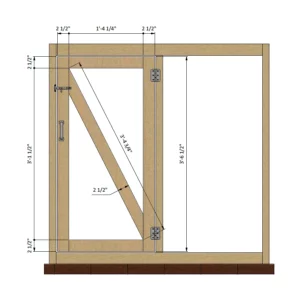
| Lumber 2 “x3” | pcs | 2 | 1′-4 1/4″ | Girts |
| Lumber 2 “x3” | pcs | 1 | 3′-4 3/4″ | Cross brace |
| Lumber 2 “x3” | pcs | 2 | 3′-6 1/2″ | Girts |
Chicken Ladder
| Material | Unit | Qty | Size | Note |
| Lumber 1 “x2” | pcs | 3 | 11″ | |
| Lumber 1″ x6″ | pcs | 2 | 2′-6″ |
Chicken Coop Roost
| Material | Unit | Qty | Size | Note |
| Lumber 2 “x2” | pcs | 2 | 3′ | Treads |
Fasteners & Hardware
| Material | Unit | Qty | Size | Note |
| Tee surface mount hinge (3″ x 3″) | pcs | 2 | ||
| Door hinge (3″) | pcs | 4 | ||
| Door handle | pcs | 2 | ||
| Surface bolt (3″) | pcs | 2 | ||
| Rope | ft | 6 | ||
| Sheet metal screws with neoprene washer (1/2″) | pcs | 30 | ||
| Wood screws (1″) | pcs | 80 | ||
| Wood screws (1 1/2″) | pcs | 480 | ||
| Wood screws (3″) | pcs | 70 | ||
| Wood screws (5″) | pcs | 10 |
Recommended tools
- Pliers
- Knife
- Hand saw or circular saw
- Reciprocating saw
- Chisel
- Spade
- Spirit level
- Drill
- Cordless drill/driver
- Screwdriver
- Measuring tape
- Hammer
- Crowbar
Step 1: Preparing and Building the Foundation
The first step when building a chicken coop is choosing an appropriate site. Pick a level area a few feet from your house and your neighbor’s. Local ordinances often require chicken coops to be built at least 30 feet from dwellings.
Prepare the chosen area by clearing vegetation and rock, then lay out the foundation. If the preferred area is not level, grade the site to have a relatively level ground to work on.
Using the illustration below as a reference, measure and mark out the ground, then dig trenches at least 8 inches ″ wide and 12 inches ′ deep. This chicken coop is not large, so you don’t need deep trenches.
Next, fill the trenches to ground level with concrete. Ensure the concrete itself is also level, and let it cure. Curing times vary from one brand to another, read the packing for recommended curing times.
Once the concrete foundation has dried, lay standard-sized bricks across it, using mortar to bind them. You will need about 36 bricks for this step.
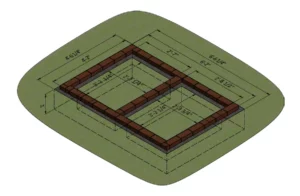
Step 2: Assembling the Coop’s Main Frame
To assemble the main frame, you will need six 2″ x 3″ boards cut to 3′ 9″ and four 2″ x 3″ boards cut to 5′ 9″ for the top and bottom beams, four 2 “x2″ beards cut to 4′, three 2″ x 2″ cut to 3′ 7″, and two 2″ x 3″ cut to 11″ for the studs, three 2″ x 3″ boards cut to 3′ 9” and two 2 “x3″ boards cut to 2′ 9” for the floor joists.
Fasten the beams to the bottom rails using 3-inch ″ wood screws, then use a speed square or framing square to check the corners to ensure they are 90°.
Use the illustration below as a guide for this step.
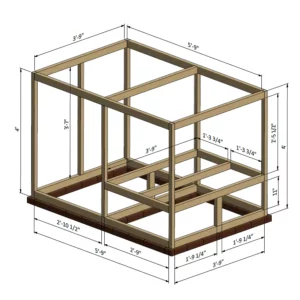
Step 3: Assembling the Floor and Walls
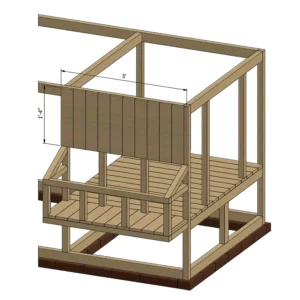
Cut thirteen 1″ x 4″ boards to 3′ to use as floorboards and install them. Use the diagram below as a reference.
Next, cut 2″ x 2″ lumber – one board to 2′ 9″ and two boards to 2′ 4 ¾” – to use as sheathing rails for the front and left walls. Install the boards using the diagram below as a guide.
After installing the boards, use a framing square to check the corners to ensure they are 90°.
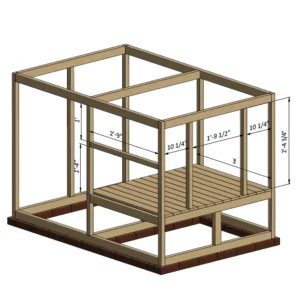
Step 4: Assembling the Nesting Box Frame
Nesting boxes are a critical component of any chicken coop and offer a place for your girls to lay eggs.
For assembling the nesting box frame, you’ll need 2″ x 2″ and 1 “x4″. Using 2″ x 2″ lumber, cut two boards to 3′ and two boards to 9″ to use as front girts, two boards to 1′ 1 ¼”, and four boards to 10 ½” for side girts. Install the boards, guided by the diagram below.
From 1″ x 4″ lumber, cut ten boards to 1′ 1 ½” and secure them using 1 ½” wood screws to create the nesting box floor. Next, prepare two girts 1′ 3 ¼” long and two girts 8 ¼” long from 2″ x 2″ board. Install them on the front frame and the side wall.
Using the illustration below as a reference, provide a slope for the nesting box lid. You will need two boards cut to 1′ 1¼” long.
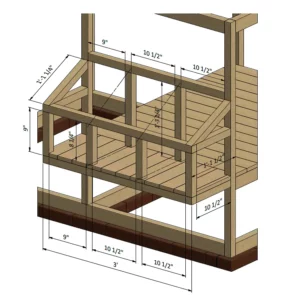
Step 5: Installing Sheathing for the Side Wall
Cut eleven 1″ x 4″ boards to 1′ 4″ length and install them to cover the left wall as shown in the diagram below. Next, cut eleven 1″ x 4″ boards to 1′ 4″ length and install them to create the proper wall sheathing, using the diagram below as reference.
Use 1½-inch ” wood screws to fasten all the wall sheathing boards in this step.
Step 6: Assembling the Roof Frame
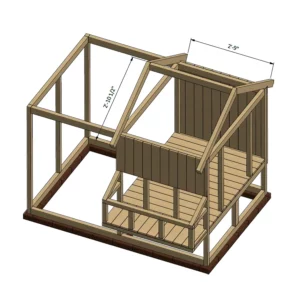
You will need 2″ x 3″ boards cut to size to assemble the roof frame. For the rafters, cut four boards to 2′ 10 ½”.
Next, cut a 2′ 9″ board from 2″ x 3″ lumber to use as a ridge board.
Using 3-inch ″ and 5-inch ″ wood screws, connect the beam to create the roof frame using the diagram below as your guide.
Step 7: Installing the Front Wall Sheathing
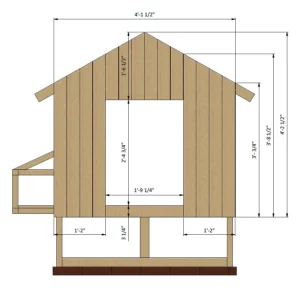
Cut eight 1″ x 4″ boards to 3′ 8 ½” length and six 1″ x 4″ boards to 1′ 6 ½” length for the front wall. Using the illustration below as a reference, install the sheathing by fastening the boards with 1½-inch ” wood screws. Once all the boards are secure, cut the top edges to fit the rafters.
Next, cut one board 3 ¼” x 1′ 9 ¼” from 1″ x 4″ lumber and install it at the bottom of the door opening as shown in the diagram.
Step 8: Installing Back Wall Sheathing
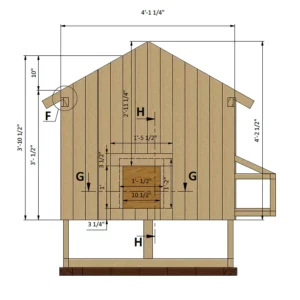
For the back wall, you will need ten 1″ x 4″ boards cut to 3′ 10 ½” length and three 1″ x 4″ boards cut to 2′ 11 ¼” length. Using the diagram below as a guide, secure the boards with 1½-inch ” wood screws, then cut them to fit the rafters.
Next, cut one board to 1′ 5 ½” length for the door header and three boards to 3 ¼” length for the door bottom, from 1″ x 4″ lumber. Secure the boards with 1½-inch ” wood screws.
For the door, cut a 1′ ½” x 1′ 2″ plane from a ⅝” plywood sheet and use 2″ x 3″ boards to make the chicken door guides. You need two boards cut 2′ 4 ¾” for the guides.
Using the diagram below as a reference, cut the recesses to allow the door to slide up.
Step 9: Installing Nesting Boxes Sheathing
Sheathing the nesting box takes only 1″ x 4″ boards. You want to create a robust surface that will hold eggs in place and stand the test of time.
Cut eleven boards 1′ long and six 1′ 5 ¼” long from 1″ x 4″ lumber, and install them guided by the diagram below. Cut the top edges of the planks to fit the frame girts.
Next, cut six boards 1′ 1 ½” long and install them to partition the nesting box, as shown in the diagram below. The topmost board in each partition is trimmed to fit the slope of the nesting box lid.
You will be using 1½-inch ” wood screws in this step.
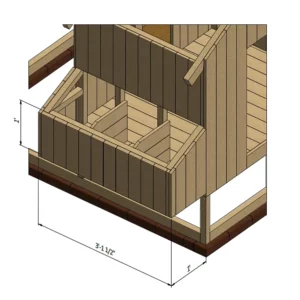
Step 10: Installing the roof
Roofing a chicken coop can be challenging since you may need a ladder and the help of another person
For the roof sheathing, you need twenty 1″ x 4″ boards cut to a length of 4′. After cutting the boards, use the diagram below as a reference and fasten the boards with 1½-inch ” wood screws.
Next, cut four boards 3′ 4″ long and three boards 1′ ½” long for the nesting box lid top and bottom, respectively. Join the boards to cover the nesting box and trim the edges of the bottom girts to fit the nesting box slope angle.
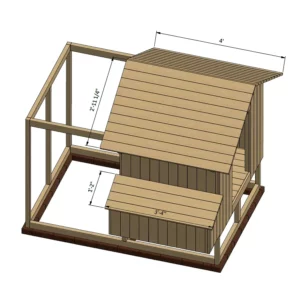
Step 11: Installing the Coop’s Corrugated Roofing
After installing the roof sheathing, the next step is to install corrugated roofing. A 4′ x 6′ chicken coop is relatively small, requiring only two pieces of corrugated roofing panels, each 3′ ¼” x 4′ ¾”. You will also need one piece of corrugated roofing panel measuring 1′ 3″ x 3′ 4¾” to cover the nesting box lid.
Place the roofing panels properly and fasten them with ½-inch ″ sheet metal screws with a neoprene washer. With the corrugated roofing panels in place, crown the roof with a metal roof ridge cap 4′ ¾” long. A ridge cap prevents rainwater and snow from entering the chicken coop, which would deteriorate its structural integrity.
Once you finish the roof, connect the nesting box lid to the side wall with the help of two 3″ x 3″ tee hinges. Hinges allow the lid to swing, which makes egg harvesting hassle-free
Use the diagram below as a reference for this step.
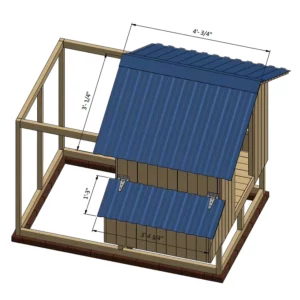
Step 12: Assembling and Installing the Front Door
A chicken coop doesn’t require a complicated door. Even so, the door needs to be sturdy enough to deter predators.
To build the door frame, you will need two boards 1′ 9″ long for horizontal girts and one board 2′ 5 ½” for the cross brace. Next, cut six boards 2′ 4 ¼” long for the exterior siding. The boards should be 1″ x 4″.
Join the door frame and fasten the exterior siding using 1½-inch ” wood screws.
Once you have assembled the door, install two 3″ door hinges, affixing them with six 1-inch ″ wood screws. Attach a 6″ door handle and a 3″ slide bolt to finish the installation.
Use the illustration below as a reference.
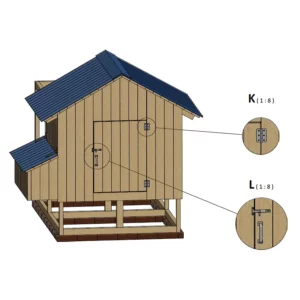
Step 13: Assembling and Installing Aviary’s Door
The aviary’s door is relatively easy to build. To get started, cut two 2″ x 3″ boards to 3′ 6 ½” to use as vertical girts and two 2″ x 3″ boards to 1′ 4 ¼” to use as horizontal girts. From 2 “x3″ lumber, cut one more board 3′ 4 ¾” to use as a cross brace.
Assemble the boards with 5-inch ″ wood screws to build the aviary’s door frame.
Next, install two 3″ door hinges using 1-inch ” wood screws, then attach a 6″ door pull and 3″ surface bolt to finish the installation.
Use the diagram below as a reference for this step.
Step 14: Assemble the Chicken Ladder
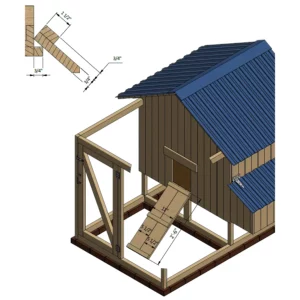
To build a ladder for your birds, you will need three 1″ x 2″ boards cut 11″ and two boards 2′-6 “cut from 1″ x 6″ lumber. Assemble the ladder by joining the beams using 1½-inch ” wood screws.
Use the diagrams below as a reference when assembling and positioning the ladder.
Step 15: Install Mesh Wall
You are almost done with the exterior of your coop.
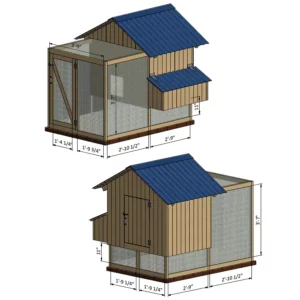
Using the diagram below as a guide, cover the wall with a ¼” wire mesh and secure it into place using an industrial stapler. You will need about 45 square feet of wire mesh for this coop.
Step 16: Assembling the Roost
The roosting bar is an essential component of any chicken coop, and it provides a comfortable place for your chickens to perch when resting and sleeping at night.
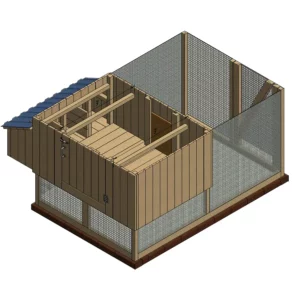
Considering that you need to provide 12 inches of roosting space per chicken, you must assemble two roosts to suit a flock of six birds.
From a 2″ x 2″ lumber, cut two boards 3′ long and install them between the front and back walls using the illustration below as a guide.
Step 17: Assembling a Lever to Open the Door
You should install a door–opening lever l to enjoy convenience when opening the coop.
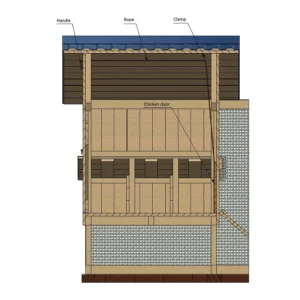
Install a clamp at the ridge board above the coop’s door to improvise a lever. Next, drill a hole in the front wall under the door, and pull a rope through the hole. Connect this rope with the chicken coop door and the other end to the handle.
For proper installation, use the diagram below as a guide. You can lubricate the grooves with soap for better glide.
Decorate Your Chicken Coop
Congratulations! You have built your chickens a safe, cozy place they can call home. You can finish it using your favorite paint, stain, or clear wood preservative.
